Setting up AI / LLM
The AI / LLM infrastructure layer described here is still under development and is not part of a released Chemotion ELN version. It currently lives on a feature branch that has not been merged, so names of screens, fields and configuration files may still change, and no release date or version number can be given. Do not rely on this page for a production installation yet.
This page is for administrators. It covers connecting the ELN to a Large Language Model (LLM) service and deciding who may use it. For what users then see and do, see AI features.
An administrator decides three things:
- Which LLM services the institution offers — the endpoints requests are sent to, and the keys that pay for them.
- Who may use them — everyone, or named people and groups, down to individual models.
- Whether users may bring their own service and API key instead.
Nothing works until at least one provider exists and at least one person is granted access, so the order below is the order to do it in.
Before starting
The following are required:
- An endpoint URL and an API key for the service to be offered. The institution may already run one; otherwise this is an account with a commercial provider, or a self-hosted model server.
- A model name the endpoint serves. Every provider must name a default model — it cannot be saved without one.
- Ghostscript on the ELN worker, for SDS extraction. It converts the stored PDF to text before anything is sent to the model.
- A running background worker. SDS extraction is a delayed job on the
extract_sdsqueue. Without a worker the button spins and nothing happens.
Where to find it
Open the admin interface and click AI / LLM Config, the last entry in the sidebar. The admin interface is a single page whose sections have no individual URLs, so there is no direct link to this screen.
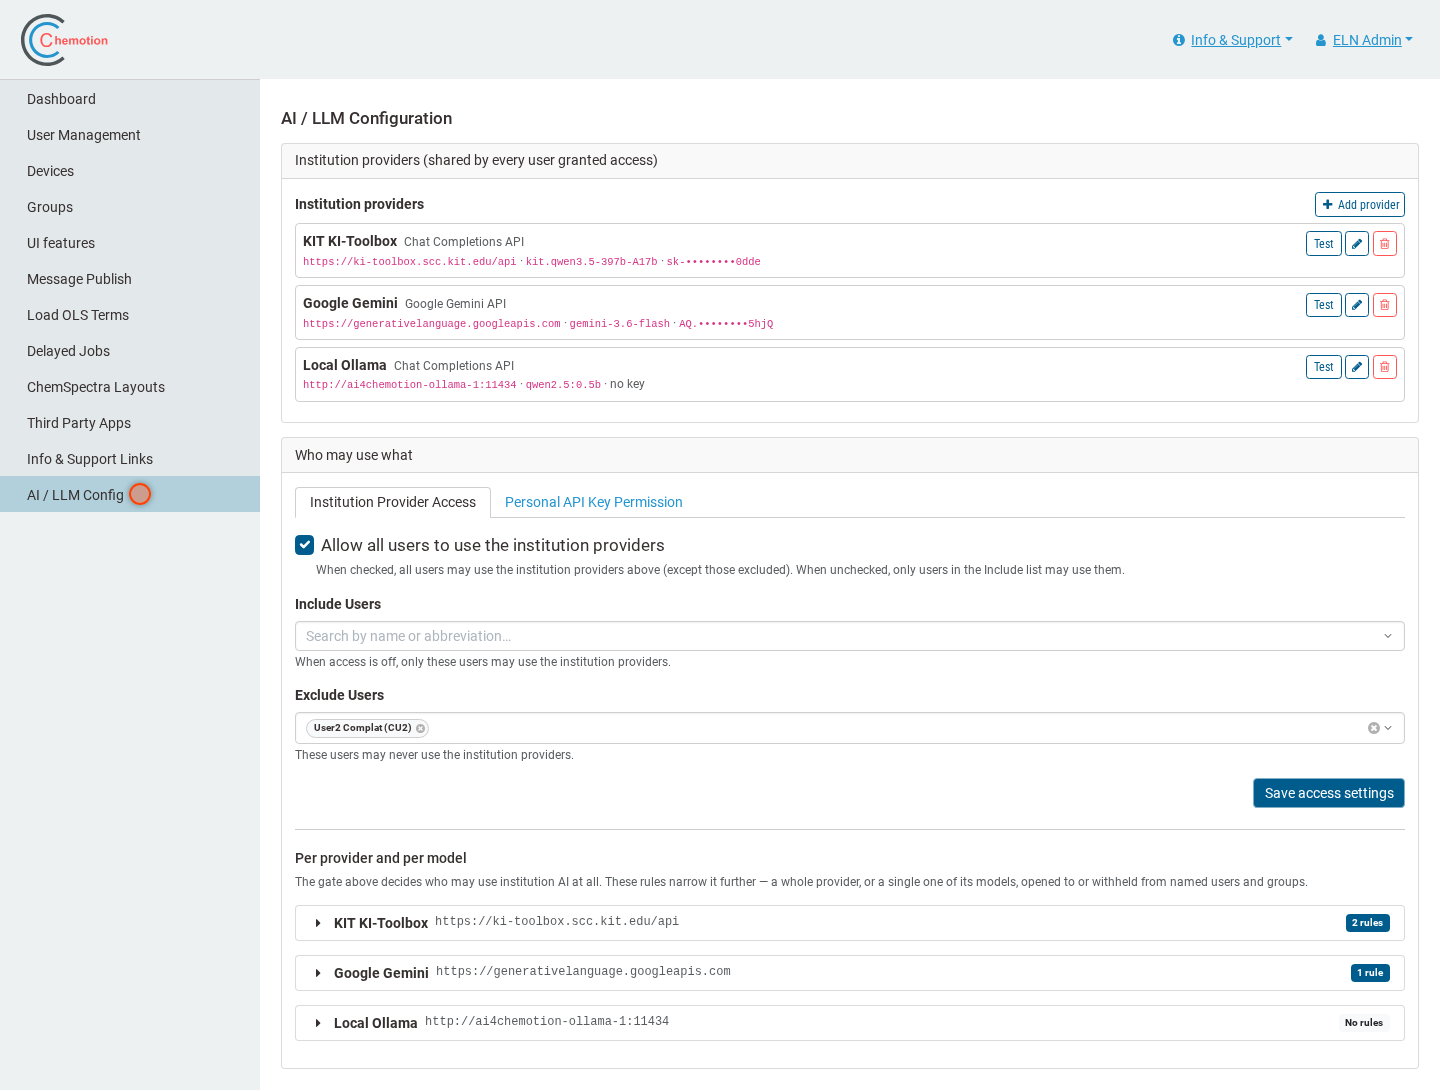
There are two cards: Institution providers at the top, and Who may use what below it, which holds both access gates and the per-model rules.
Step 1 — Add a provider
An institution provider is one endpoint that requests are sent to. Everyone granted access uses it without needing a key of their own, and several can be offered side by side.
Click Add provider. If the installation ships presets, start by choosing one — it fills in the endpoint, the protocol and a default model.

The fields that matter:
- Name — how the provider appears to users. Pick something they will recognize, such as KIT KI-Toolbox, not openai-prod-2.
- API protocol — the request format the endpoint speaks, not who runs it. Chat Completions is the default and covers OpenAI, institution gateways, vLLM, Ollama, LM Studio and Azure. The other two are Anthropic's Messages API and Google's Gemini API.
- API endpoint URL — required for Chat Completions. Anthropic and Gemini fall back to their official endpoints if it is left blank.
- Default model — used by every task that does not name its own. Free text, not a dropdown.
- API key — optional. A locally hosted model server usually needs none. It
is encrypted at rest and never shown again in full, only masked as
sk-••••••••0dde.
Three fields are required, not two. With the default protocol the endpoint URL is required alongside the name and the model. Until all three are filled, both Test connection and the save button stay disabled and the form states which one is missing:
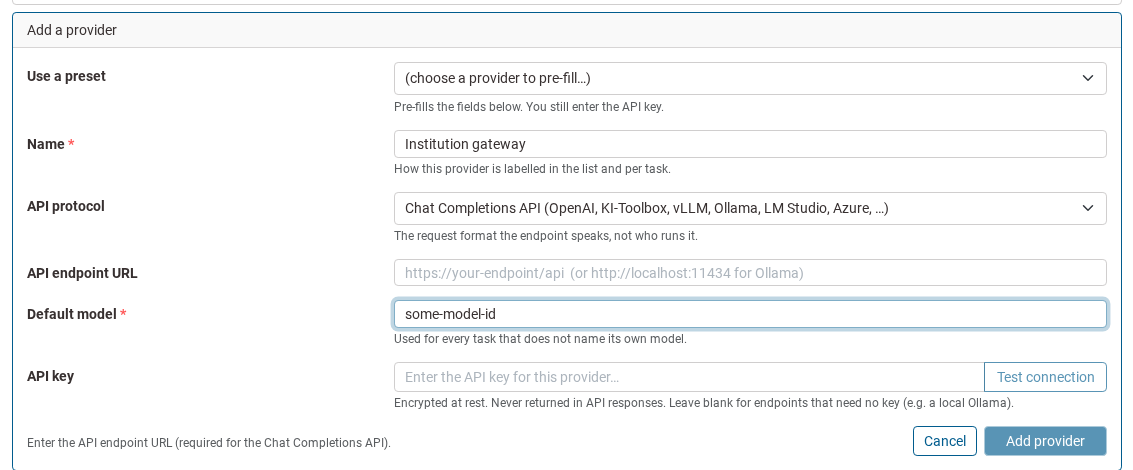
Choosing a preset overwrites the Name field too, so pick the preset first and rename afterwards. Changing the API protocol clears the endpoint, model and key in the open form, because those values are protocol-specific.
Provider presets
The preset picker comes from config/llm_provider_profiles.yml. The file is
optional and entirely editable — if it is missing or malformed the picker
is simply hidden and manual entry still works. A preset never carries a key.
profiles:
  - key: my_institution
    label: "My institution's AI service"
    protocol: openai              # openai | anthropic | gemini
    base_url: "https://ai.example.org/api"
    default_model: "some-model-id"
    notes: "Requires an institution API key."
Fill in default_model wherever possible: a provider cannot be used without
one, and leaving it blank just moves the work to whoever picks the preset.
Step 2 — Check it works
Test sends one minimal request using the stored key and reports back below the list. Green means the endpoint answered; red quotes what came back instead — usually enough to tell an expired key from a host that no longer resolves.

The provider form has its own Test connection button for values that have been typed but not yet saved. Use that one before saving something new.
The check passes on any answer from the endpoint, including an empty one. It proves the endpoint is reachable and accepts the key. It does not prove the configured model will produce useful output for a real task.
Step 3 — Decide who may use AI
Open the Who may use what card. Each tab is one permission, and each saves independently — switching tabs does not carry unsaved edits across.
Both work the same way: tick the box to allow everyone and use Exclude Users for exceptions, or leave it unticked and name the only people who may in Include Users. Groups count, so a whole group can be granted at once. The pickers search as text is typed and offer a handful of matches; an empty box offers nothing.
Institution Provider Access — may this person use the providers configured above? Enabled by default.

Personal API Key Permission — may this person configure their own endpoint and key in their profile? Disabled by default, so bringing a personal key is opt-in until an administrator enables it.

Someone granted neither permission has no AI access, and the AI section is hidden from their profile entirely.
A third entry, aiFeatures, still exists in the database as a legacy master
switch. It has no control on this screen and is not evaluated — access is
decided by the two permissions above.
Step 4 — Narrow it further (optional)
Most installations can stop at step 3. Use this step when one provider carries an expensive model, or a model only one group should reach.
Below the institution permission, Per provider and per model lists each provider as an expandable row. Expanding one asks the endpoint which models it offers, then allows rules to be added.
A rule says what it applies to — the whole provider, or one of its models — and then either Everyone, except… or Only these users. A rule can only narrow the permission above it, never widen it.

Add rule does not ask what the rule is for. It fills the first target that has none — the whole provider first, then the first model without a rule — and it is retargeted afterwards with Applies to. So to restrict a single model, click Add rule twice.
Anything without a rule is unrestricted. The checkbox Offer only the models a rule below names inverts that for one provider: a model must then be named by a rule before anyone is offered it, and until one is, the provider is marked Restricted, no rule yet.

Save access rules replaces every rule on that provider with what is on screen, so edit the whole card and save once.
These rules apply only to institution providers. A provider a user configured themselves is private to them and has nobody to grant it to.
Keeping providers up to date
Changing a provider
The edit pencil reopens the same form. The key field is empty and the stored key is shown masked above it, with the rule attached: leave it blank and the key is kept, type in it and the key is replaced.

Changing the endpoint or the protocol without supplying a new key drops the stored key, so that a key issued for one host is never sent to another.
Removing a key without removing the provider
The bin beside the key field does this — useful when a key is withdrawn and its replacement has not arrived yet. It warns first: the provider stops working for everyone until a new key is entered.

Deleting a provider
The bin at the end of a row asks in the row itself, not in a dialog, and states the consequence: its key is removed and everyone routed to it falls back to the first remaining provider. Its access rules and any per-task routing pointing at it go too.

Assigning a model to a task
There is no task-to-model control on this screen. Sending a particular task to a particular provider or model is each user's own choice, in their profile — see Task routing. What an administrator controls is which models they may choose from, through the rules in step 4.
Reference
Where model lists come from
The models offered in the rules and in each user's task routing are read from
the provider itself, not from configuration. The answer is cached for 30
minutes per endpoint, protocol and key. A preset's models: list is consulted
only when the endpoint reports none at all.
Environment variables
| Variable | Purpose |
|---|---|
LLM_API_KEY_ENCRYPTION_KEY | Secret the encryption key for stored API keys is derived from. Outside production it falls back to secret_key_base. |
LLM_ALLOW_PRIVATE_ENDPOINTS | Allows user-configured endpoints to point at loopback and private addresses, for example a local Ollama. |
By default a user-configured endpoint may not address loopback, link-local (including cloud metadata addresses) or private ranges, and host names are re-checked when the connection is made. Institution providers configured by an administrator are exempt, which is the intended way to offer a locally hosted model.
Task definitions
Each AI task is a YAML file under config/llm_tasks/. The branch ships one,
sds_extraction.yml, defining the prompts, the JSON output format, the
sampling temperature, token limit and timeout, whether it runs inline or as a
background job, and which validator normalizes the answer. Adding a file adds a
task; no code change is needed.
Privacy and auditing
Every task execution writes a structured [LlmAudit] line to the Rails log:
timestamp, task, user, provider, model, the credential-stripped endpoint, and
the outcome. There is no database-backed audit table yet.
Text sent to a provider leaves the ELN installation. For SDS extraction that is the Identification, Hazard identification, Composition, Exposure controls and Physical and chemical properties sections of the stored PDF. Choose the endpoint accordingly, and tell users which service their data goes to — their AI settings show them the endpoint, but not the institution's contract with it.