Using the AI features
The AI features described here are still under development and are not part of a released Chemotion ELN version. They currently live on a feature branch that has not been merged, so screens, labels and behaviour may still change, and no release date or version number can be given.
The ELN can hand certain jobs to a Large Language Model (LLM). Today there is one: reading a Safety Data Sheet PDF and filling in the safety data automatically, instead of typing hazard statements and physical properties by hand.
Which AI service does that work is decided by an administrator — or by the user, where the administrator allows personal providers. This page covers both, then the extraction itself.
Anything an LLM produces is generated automatically and can be wrong. Always check it against the sheet before relying on it.
To simply use the feature, skip to Extracting safety data. The settings below have working defaults, and in most installations nothing needs changing.
Finding the AI settings


Open the menu under the user name in the top right, choose Settings, then AI/LLM Settings in the list on the left.
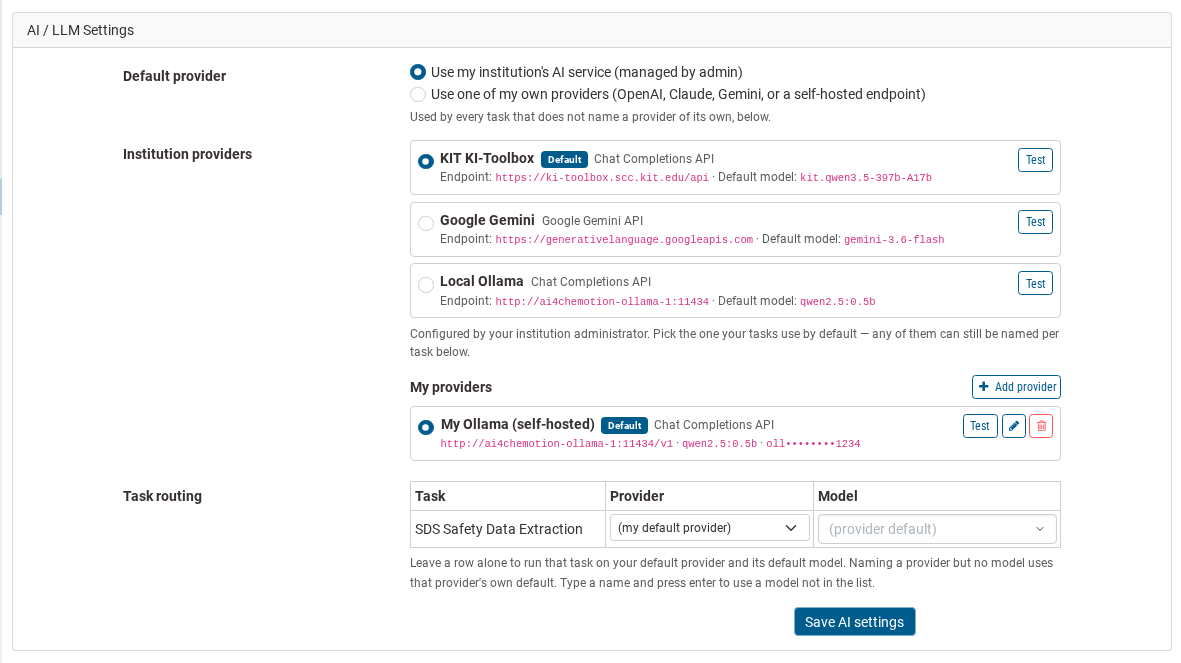
If the entry is not there, the administrator has not granted AI access — ask them. Nothing on this screen is stored until Save AI settings is pressed.
A few messages elsewhere in the ELN refer to Profile → AI Settings. They mean this screen; no screen of that name exists.
Choosing which service answers tasks
At the top, choose between the institution's AI service and a personal one. Only the options the user is entitled to appear, so with a single permission there is nothing to choose here.
Under that, the providers the administrator has configured are listed with their endpoint and default model, so it is always clear where the data would be sent. Test checks that a provider answers, using the administrator's key.
When more than one is offered, each row has a radio button. One already carries a Default badge before anything is picked — that is the fallback the ELN would use. Choosing another and saving moves the badge:
This is the provider every task uses unless a task names its own, further down.
Using a personal provider
Only available if the administrator has enabled personal API keys. If the My providers section is missing, that is why.
Click Add provider. A preset fills in the endpoint, protocol and a model for a common service; the key is always supplied by the user.

A personal provider needs a name, a protocol (Chat Completions for OpenAI, self-hosted servers and most gateways; otherwise Anthropic or Gemini), a base URL for Chat Completions, and a default model. The API key is optional — a local model server often needs none. Keys are stored encrypted and shown only masked afterwards.
Test connection checks the values before they are saved.
Two things worth knowing:
- Default model here is a plain text field, not a dropdown. The list of models a provider actually offers appears further down, in task routing.
- Adding a provider does not switch away from the institution service — choose that option at the top. But marking a personal one as the default does switch, which is easy to do without meaning to.
Personal providers may not point inside the ELN's own network. Picking a preset for a locally hosted service and saving it unchanged is the usual way to hit this:
The endpoint must not point at localhost: private and loopback addresses are reachable only through an institution provider.
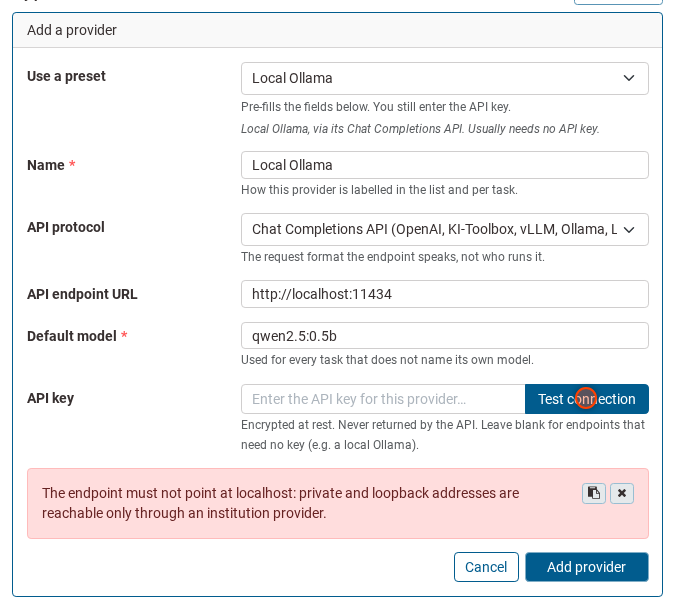
This is a safety restriction on user-supplied endpoints. A local model server can still be offered — as an institution provider, set up by an administrator, which is exempt.
Send one task to a specific model
By default every task uses the provider chosen above and its default model. Task routing overrides that for a single task — useful when one model is better at a job, or cheaper.
Pick a provider for the row, then open the Model list. It is filled from the models that provider actually reports; type to narrow it, or type a name that is not listed and press enter.
Changing the provider clears the model, since the two belong together. Leave a row alone and the task falls back to the chosen default.
If the named model fails — busy, rate-limited, timed out — the task is retried once on that provider's default model. An authentication failure is not retried, and the request is never sent to a different provider.
Extracting safety data from an SDS
This is the feature the rest of the page exists to support.
Open the sample, go to the Inventory tab and find the Safety section. The row of the stored safety data sheet holds the extraction controls:
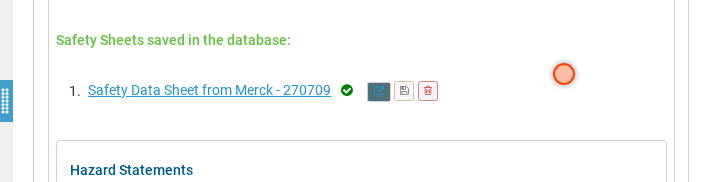
If the row can be read both ways, a toggle offers AI (read the stored PDF with a model) or Vendor site (the older route, which scrapes the supplier's page). With only one route possible, no toggle is drawn.
To run it: make sure AI is selected, then click Extract Safety Data — the sparkle button.
The work happens in the background. The button reads Extracting…, and the tab fills in by itself when the result arrives — typically in well under a minute.
After about ninety seconds the button resets and reports that it is taking longer than usual. That is a message about the button, not the job. The page keeps checking quietly for around seven minutes, a notification arrives when the extraction finishes, and the data appears on its own. Navigating away is safe — the result is waiting the next time the tab is opened.
If the button is disabled
- No AI provider is configured. Set one up above, or ask an administrator.
- The safety sheet was attached by hand. Then there is no stored PDF to read, and the row shows a plain disabled button with an information icon instead of the sparkle. This is not a fault.
Running an extraction needs the same permission as editing the sample.
What the extraction returns
Only the useful parts of the PDF are sent: Identification, Hazard identification, Composition, Exposure controls and Physical and chemical properties. Headings are recognized in several languages.
From the answer the ELN fills in:
- H, EUH and P statements, mapped to the standard phrase texts
- GHS pictograms, derived from the codes
- physico-chemical properties — boiling and melting point, flash point, density, vapor pressure, solubility, viscosity, pH, explosive limits, form, color, refractive index, purity — which are also copied into the sample's own properties where they fit
Mixtures are handled as mixtures: instead of one CAS number the result lists the components with their names, CAS numbers and concentrations.
Checking the result
The document icon beside the extraction button opens Extracted Data using LLM: what the model returned, when, and which model produced it. It stays disabled until an extraction has run for that sample.
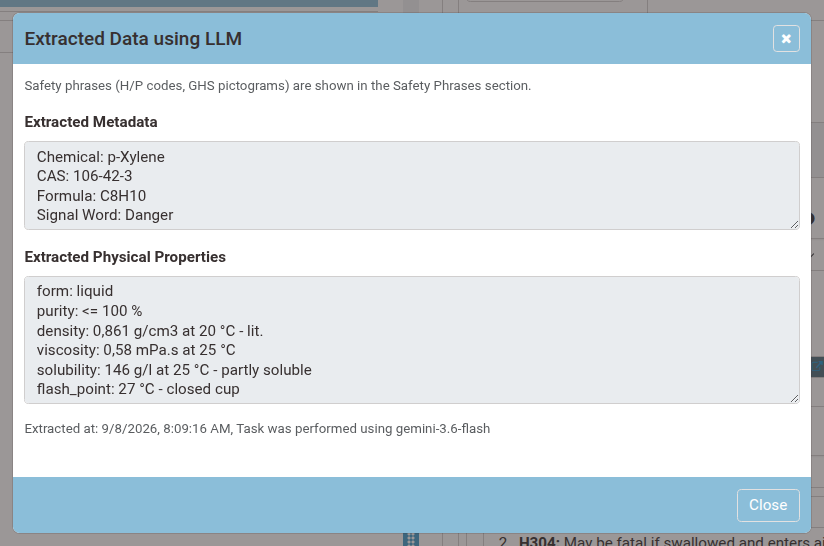
Read it as what the model found in the attached PDF, which is not necessarily the substance the sample is named after. In the example above the stored sheet is the one for p-xylene, and the extracted data describes p-xylene.
Before trusting the result
- The extraction can only read what is in the PDF. A scanned sheet with no text layer yields nothing usable.
- The model is told to leave out anything it cannot find rather than guess, but mistakes still happen. Check hazard statements and properties against the sheet.
- Text from the sheet leaves this ELN installation and is sent to the configured AI service. The AI settings name it; otherwise ask an administrator.