Details Panel
This page is still being edited and reviewed.
The details panel or details window is opened by clicking on the desired element from element lists. It shows the information about the element that is stored or available through external databases such as PubChem. The panel/window can be set to full screen mode. Its frame is identified by two colors: dark blue and light blue. The color light blue means that changes have been made within the panel, but they have not been saved yet. If this is the case, a small save symbol also appears in the panel bar . As soon as all the entered data has been saved, the frame color changes to dark blue and the symbol disappears. This can be observed in the animation below.
There are three different types of fields within the details panel:
- Fields for freely entering either text or numbers. Example: sample's Name and Description.
- Fields with predefined drop-down menus to pick from. Example: Solvents.
- Fields with data made available from other databases and applications based on the user's structural input. Example: The calculation of the sum formula or the generation of the SMILES.
Tabs were introduced to organize the information within the details panel. They enable information structuring and displaying as in folders. Different tabs are available based on the type of the element. Tabs can be made visible and invisible. This will become clear in the later chapters.
Users can configure their own tabs; these tabs can be hidden or shown in the user's preferred ordering. By clicking the small blue symbol on the right of tabs, drag and drop the tab to change the ordering or into the dark block to hide the tab.
There are some tabs which are common for multiple elements while some tabs are specific to each element.
Common tabs in Details panel
Analyses tab
Chemotion ELN uses analyses, datasets and attachments to structure analytical data. Please use them in the intended manner (see description below).
The Analyses tab allows users to add analytics to the Chemotion ELN. Users can enter experimental results (field Content) and upload associated files (see Dataset). The Content field supports the validation according to specific data types (data types are confirmed by the ontology terms). For 1H NMR and 13C NMR, the Content field is checked for the entered amount of 1H NMR or 13C NMR signals and compares the given number with the number of signals expected according to the amount of H- or C-atoms.
The content of 1H NMR and 13C NMR analyses is validated by screening the information on atoms given in brackets, e.g. 1.11 (s, 3H) -> 3Hs counted. Therefore it is important to add all carbons to the Content, e.g. 129.3 (s, 2C). Also, if signals are hidden or too broad to be detected or not detected due to H/D exchange, users may indicate this by adding an explanation: e.g. "Missing OH-signal due to H/D exchange (1H)". The information in brackets is also counted.
For mass spectrometry, the expected molecular mass is used for a comparison with the data given in the Content of the analysis.
A green checkmark indicates if the Content of the analysis matches the expected data (calculated from the molecular structure).
1H NMR analysis
13C NMR analysis
For reference, see here
Users can create as many analyses as needed with the button . For each analysis, users can upload as many datasets (files) as desired with the button . Please pay attention to the structure of the data storage and take care of the input fields, as this allows results to be searched quickly. Any information defined through the fields is available to the Chemotion ELN for processing and this data can be displayed or summarized in lists.
The uploaded records can be supplemented with information in an input popup window available for each data file. The input popup window opens either when a user creates a new data record, or when a user clicks on the link generated by the name of existing data records.
Intended structure of analytical data
The hierarchy of analytical data is structured as follows. One or more analyses can be associated with an element (e.g., sample). Each analysis can contain one or more datasets. The latter can contain one or more attachments.
More specifically, an analysis is created for every measurement type (e.g., 1H NMR).
A dataset is created for every measurement within a measurement type. For example, a user creates an analysis for a 1H NMR measurement that has been repeated once with 16 scans, and once with 64 scans. Those two scanning runs can be represented as two separate datasets in the same analysis. The latter analysis could be further extended with 1H NMR experiments that tested different solvents.
Attachments are data files associated with a dataset. Different data files can be attached to a dataset (e.g., images, raw data in open or proprietary formats). Chemotion ELN offers various file conversion procedures. They result in an increased number of attachments. One example is the creation of image files to support the preview of data.
Users can find out at a glance which data have been added to an analysis, since they are shown in short form e.g. in the sample list. The illustration shows the sample list with symbols such as or . The first case means that an analysis has been set for the analyzed sample, but its Status is Unconfirmed. The second symbol indicates an existing analysis whose Status has already been Confirmed, and is therefore considered correct. The displayed count refers to the number of analyses, not to the number of uploaded data files. If analyses have no status, they are not visible in the samples list.
The supported analysis methods are listed in the drop-down menu Type (Chemical Methods Ontology).
Choosing an ontology term is required to enable the transfer of data to the Chemotion repository. Without adding the chemical methods ontology, the transfer won't be successful.
Users can delete datasets from an analysis by clicking , or download them as a zip file with . Please note that uploaded data and entered information are not saved until the user confirms with or . Failure to do so leads to the loss of data.
The analyses tab of the reaction view differs from the analysis tab of the sample view. While samples can always have analyses, reaction Analyses can only contain Products samples that are supported by analyses. The Analyses tab of the reactions therefore only shows analyses by means of a link. To edit the data, the link (name of the product sample) to the analysis of the sample must be followed.
The wellplate analysis tab is identical to the sample analysis tab.
Users should not forget one important property of the Chemotion ELN: the uploaded data files and entered information are not saved until the user confirms that with or . This point, if overlooked, can lead to the loss of the entered data.
Direct import of files from inbox
Users can choose to drag and drop files directly from the inbox when working with datasets.
Edit and Order mode
At the top of the analyses tab there is a toggle with two options: Edit mode and Order mode.
- Edit mode (default) — analyses are shown as expandable accordion cards. Click a card to expand it and edit the analysis details.
- Order mode — analyses are shown as rich summary cards displaying a preview image, name, type, status, instrument, and content preview. Drag and drop the cards to rearrange the order. The defined order is preserved after saving and reloading the element.
Comment box
Each analyses tab includes an optional comment box for adding general notes about the analyses as a whole (separate from individual analysis content). Click the Comment button at the top of the analyses tab to show or hide it. Comments are saved together with the element.
Don’t forget to save the changes with so that the ordering persists.
References tab
The References tab of the sample allows users to manage their literature and link it to a Sample. Users can specify as many references as needed. It is possible to specify the reference either by its DOI or ISBN, or by giving it a title and a URL. In both cases, the user can add whether this reference is citing or cited by the user. When all details of a reference are entered, press . Once a reference is created, it cannot be edited, it can only be deleted instead, so to edit a reference, delete it and create a new one.
The created references are added to a list and they are shown in blue to indicate their functionality in linking to some resources by clicking on them. Each reference can be copied by using , which will copy the information provided in the list. Additional details about the reference, such as by whom it was created and whether it is referring to or cited by the user, can be shown by pressing the button , which also shows the delete button .
Don’t forget to save the changes with
The References tab of a reaction is identical to the Literature tab of a sample. It allows users to manage their literature and link it to a reaction.
Customization tabs in Details panel
Leveraging Chemotion LabIMotion's Segment function, scientists acquire the capability to intricately craft and personalize the user interface with remarkable versatility. Furthermore, by accessing templates from the Template Hub perfectly aligned with specific applications, users can enhance their interface customization experience. A standout feature of segments is their seamless assignability to individual elements, empowering users to refine the layout and appearance strategically. This distinctive attribute ensures a dynamic and flexible approach to designing interfaces.
Ready for more? Explore the possibilities with Chemotion LabIMotion for inspiration.
Details panel for samples
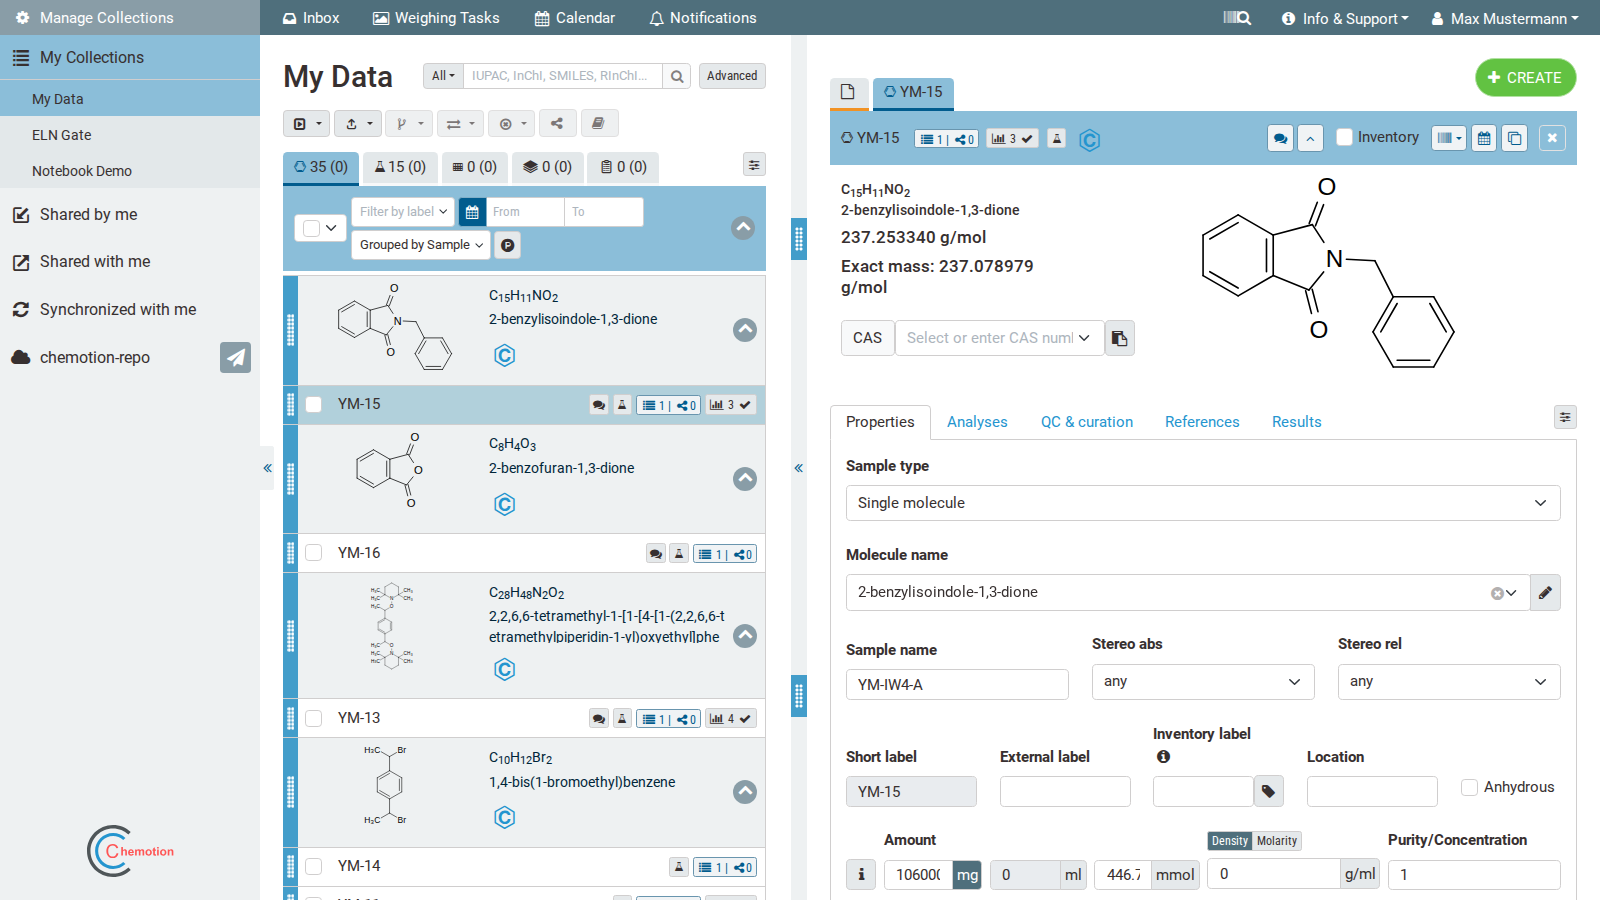 Once the user has entered and saved the structure of the sample, either with Ketcher or using the Chemical identifiers from the Properties tab, some additional information will be provided automatically. This applies to all information that can be generated by Open Babel based on the structure of the sample (sum formula, molecular weight). Likewise, the name of the molecule and its exact mass are created automatically, as far as the molecule is known via the PubChem database and this information is available, along with symbols of chemical safety. More details about chemical safety are provided as a link to PubChem as well.
Internal remark TO DO: Info to be added image of the sample frame and information
Properties tab
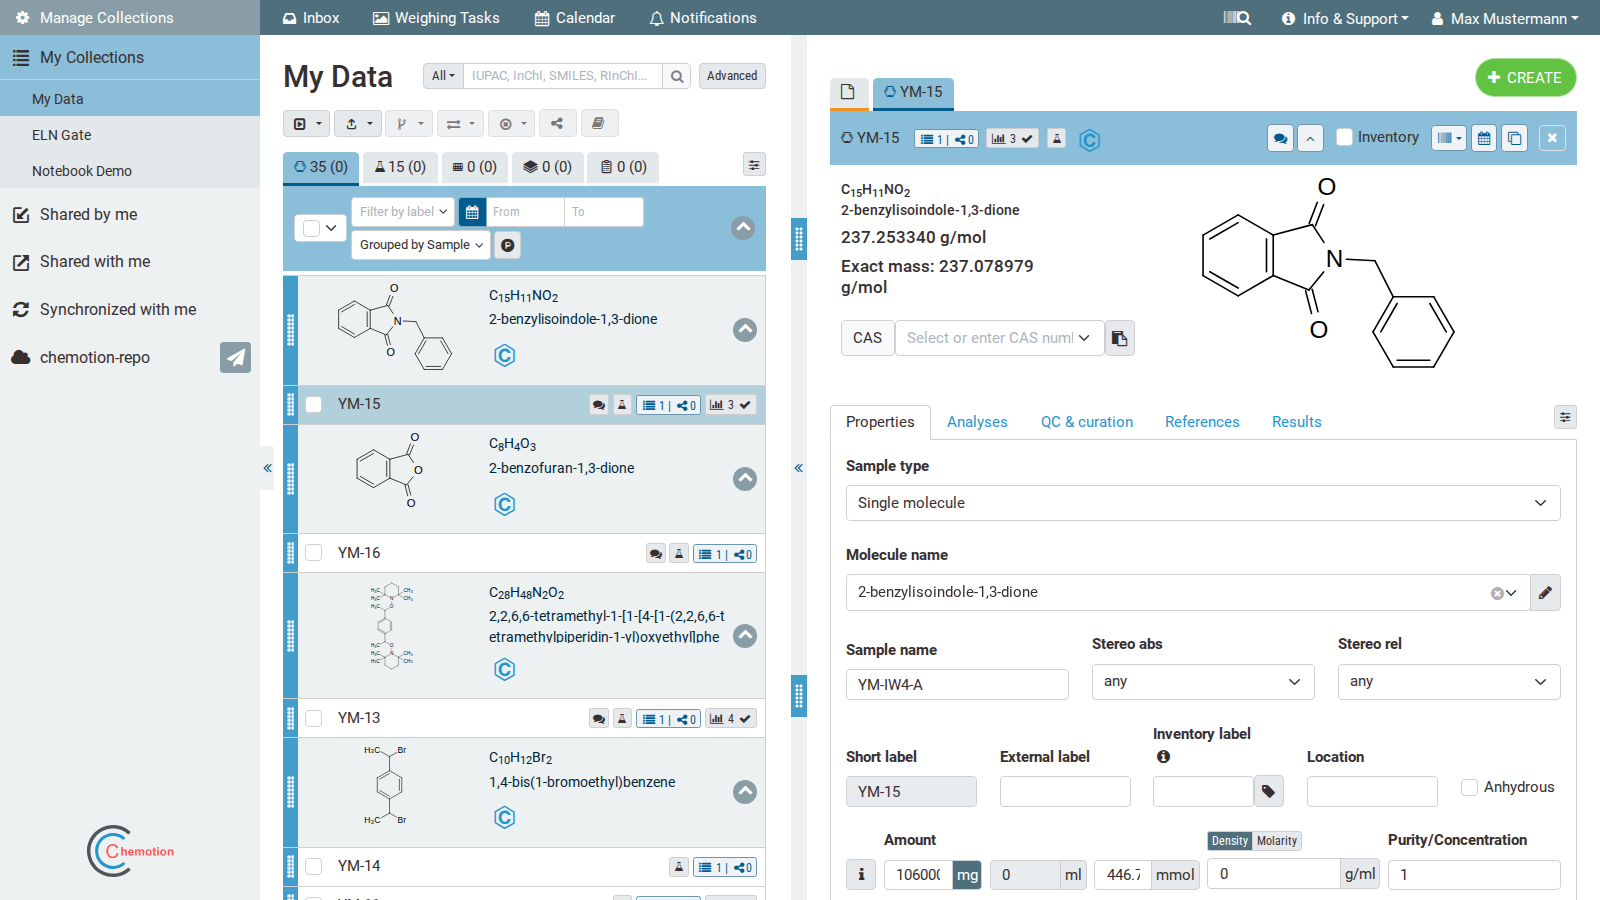 The first tab (in the standard Chemotion ELN configuration) that allows the description of samples is the Properties tab. In the Molecule field, the user can pick the preferred naming convention for a molecule or write a new one. The user can also specify the absolute and the relative configuration of the molecule in the fields Stereo Abs and Stereo Rel respectively from drop-downs. The descriptors for stereo information are recommended if the chemoinformatics tools of the Chemotion ELN (such as structure editors and toolkits) don't support full identification of the stereochemistry. The information on the given stereoconfiguration is added to the information that is used to structure molecules in the molecules' list. It allows e.g. the differentiation of certain paracyclophane isomers or other planar chiral molecules which are usually hard to distinguish by chemoinformatic toolkits.
To assign a name (e.g. a trivial name) to a sample, the user can make an entry in the Name or Description fields. Please note that the Name field for samples from reactions is overwritten by additional information. The created sample will have the selected name, but when a new sample is created by dragging and dropping into a reaction scheme, the Name field will be overwritten. Please refer to this link for more details on samples generation from other samples. To save a second or more names for a sample permanently, use the Description field.
The Name field within the Sample Properties tab is overwritten for samples that represent products in a reaction, because it is required to generate a product name.
In addition to the naming options, an External label can be saved for each sample. This External label should be used to enable a sample to be assigned to another storage system. For example, if a user makes a sample available for a reference database or sends it to a cooperation partner who renames the sample, the sample will receive a sequential number that is not determined by the user. Enter this number in the External label field. For participants in the Molecule Archive of the Compound Platform, the External label field is reserved for the X-Vial numbers of the samples.
The Molecule Archive of the Compound Platform is an infrastructure that supports scientists to store their compounds centrally and provide the compounds for diverse re-use cases. If interested, please have a look at the website of the Molecule Archive and get in contact with the Compound Platform team. It's free for all chemists from academia.
Both Boiling point and Melting point can be provided manually in Celsius °C. If the melting or boiling point is to be added as a range, please add the first value, space and second value, e.g. "50 60". This is automatically set to 50 - 60 °C by the system. The user can additionally provide any desired information as free text in the Description field and specify the location of the samples (e.g. institute, warehouse, etc.) in the Location field.
Values affecting the reaction calculation table: The Amount can be provided either as mass or in mole, where providing one of them leads to automatic calculation of the other based on the Purity (1 by default but can be modified). Mass unit can be either g or mg, while amount unit is either mol or mmol. Volume data can’t be edited until Density or Molarity are specified, then the volume is automatically calculated. Changing the volume manually leads to automatic changes in the mass and amount.
Values such as mass/amount/volume in the sample properties are referring to the sample used in a reaction or for another experiment. They are calculated as components for an experiment based on Density or Molarity depending on the use of the pure substance or a stock solution. The calculation of a molarity of the stock solution is not done in the properties field. Volume (solvent) and amount (molecule) are not used to calculate the molarity. The molarity, if required for dissolved materials, has to be added manually in the properties tab.
Density or Molarity are not calculated in the properties tab of the sample. The information comes from external sources or is added as a result from other experiments. The user can enter only density (for pure substances) or molarity (substances in solution).
Solvents can be specified from a predefined drop-down or can be added per drag and drop from the molecules' list. Solvents can be added with a ratio of the solvents if several of them are present.
The Elemental composition is automatically calculated based on the formula, but the user can still provide their experimental numbers in fields that correspond to each atom in the molecule.
The information required for chemical use is supplemented by Chemical identifiers such as InChI and InChIKey (clicking on the InCHI/InChIkey button allows to switch), Canonical SMILES and CAS number. Molecular structure is also provided in the Molfile format. Users can provide the Canonical SMILES to create a new Sample, but the SMILES cannot be modified after creation (vice versa, the SMILES is changed if the molecular structure changes). The other identifiers can only be copied after a Sample is created, and they can’t be used to generate Samples.
Decoupled mode
- From Chemotion ELN v0.8 to v2, an Admin must enable "SampleDecoupled" in the Admin UI before this feature can be used.
- Please add "undefined structure" (default) as Sum formula if the structure is not known.
The decoupled mode removes the coupling between the structure and automatically generated identifiers and properties. This can be helpful when adding structures that are difficult to add to the Chemotion ELN. Use cases include:
- situations where the structure editors fail (e.g. large structures such as macromolecules)
- sample contains undefined parts that cannot be explicitly drawn (such as polymers)
- composites and mixtures of materials
Selecting decoupled in the properties tab allows the user to draw structures in the embedded structure editors without the generation of identifiers and calculation of molecular mass. The user is then asked to add the molecular mass and the formula of the molecule in an additionally appearing interface. This gives the option to use the samples in the reaction table even though the automatic mass calculation is disabled.
**Properties for a Decoupled Sample
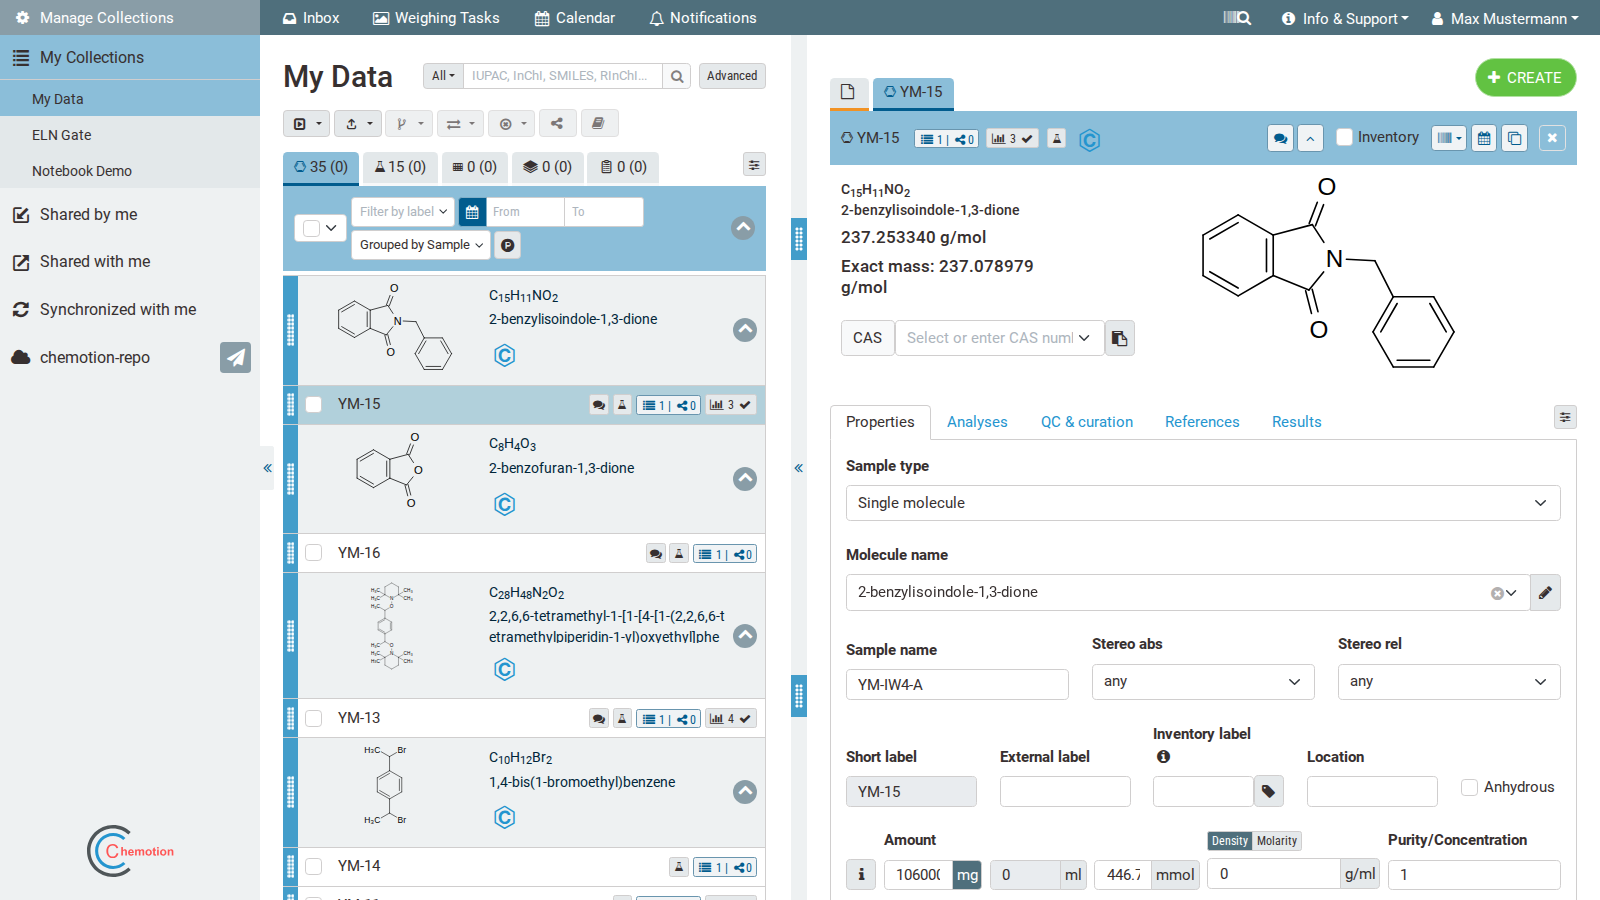
Search CAS
Users new to this feature should first read SciFinder/SciFindern Credential.
The Search CAS function (query information in SciFindern by using an API) is available in Samples and Reactions. Four different search types - substances, reactions, references, suppliers - help users to find the data that match their query.
If the SciFindern token is not set up properly, or has expired, there will be a warning message "Unauthorized. Please refresh your token" prompt. Users can get their token by going to "Accounts and profiles" and then clicking the button in SciFinder-n Credential.
Results tab
This tab is not supported at the moment as it is still being developed.
QC & curation tab
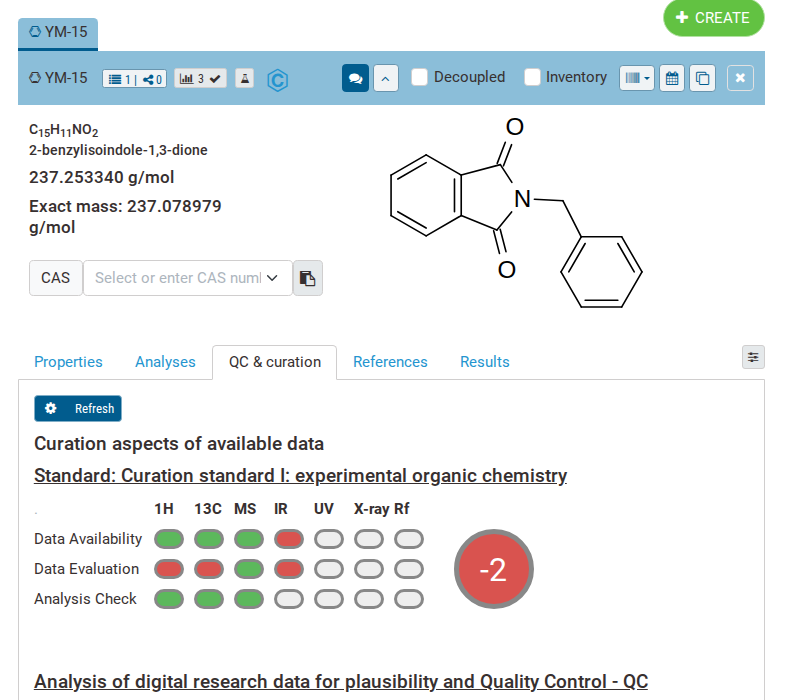
The QC and curation tab is part of the beta-testing of the Chemotion ELN. Users may use it to gain additional information on their data. The QC and curation tool uses data from the Content of the analysis (checks the calculated 1H NMR and 13C NMR data as well as mass data as described above for Content). The feature uses also information directly from the data files that were added to the Attachments of the different Analyses and extracts information that is compared to either simulated data (1H NMR and 13C NMR data) and evaluations done by machine learning tools (IR data). Requirement for running the QC and curation tool is the definition of the ontology to define the type of the measurement that is used for the analysis. Another part of the QC and curation check is the investigation for availability of open file formats. The tool checks the attachments for file types JCAMP, MzML, MzXML (either added by the user or created by the Chemotion ELN processing functions). A detailed description of the feature will follow.
Details panel for reactions
This panel includes 6 tabs named Scheme, Properties, Analyses, References, Green Chemistry, and Variations.
All of these share the reaction panel, which includes the reaction equation.
The order and the visibility of these tabs can be changed by clicking on the sky-blue tabs layout button
 on the right side. When the tabs layout button is clicked, a small table window
pops up. The order of any tab can be changed simply by clicking and dropping it to
the position where the user wants. To hide a tab, the user has to click and drag
it to the far right side of the table. To make it visible, drag and drop it again
at the desired position.
on the right side. When the tabs layout button is clicked, a small table window
pops up. The order of any tab can be changed simply by clicking and dropping it to
the position where the user wants. To hide a tab, the user has to click and drag
it to the far right side of the table. To make it visible, drag and drop it again
at the desired position.
The reaction equation can be zoomed in or out by hovering with the mouse anywhere over the reaction panel and scrolling the mouse cursor up or down.
Scheme tab
The Scheme tab contains the scheme of the selected reaction. While the molecular structure of samples (in samples details panel) can be edited by selecting the structure field and opening the Ketcher editor, the reaction Scheme (the image) cannot be changed directly. To change the scheme, select the embedded samples and change their structure or use other samples.
Edit the reaction scheme by selecting or changing the samples, the scheme cannot be edited directly.
The button for switching how the embedded samples are displayed — by name or by structure — appears on the reaction image itself. Reaction labels (my labels) are set in the Scheme tab rather than the Properties tab. When the reaction panel is given more width, the reaction table also shows additional information.
The following figure shows a typical reaction Scheme with a reagent table. Solvents or reaction temperature have not been added yet. In general, users cannot edit gray fields in the reaction table.
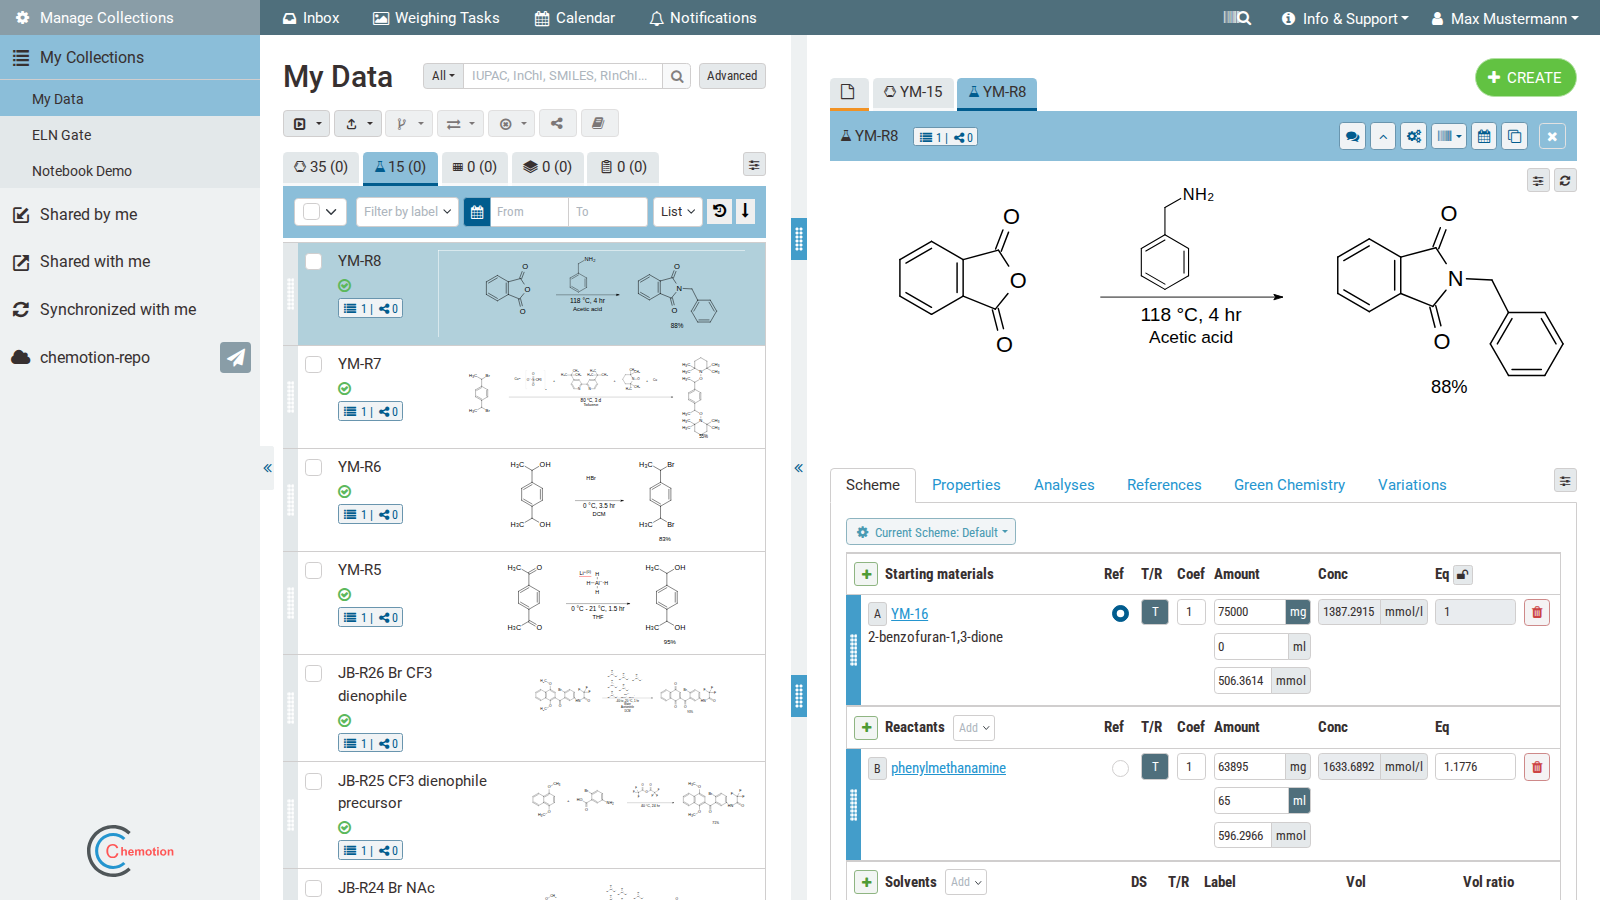
The samples are classified into Starting materials, Reactants and Products. The samples can be moved flexibly from one category to another with the drag & drop symbol . Starting materials and Reactants differ in how their corresponding samples are treated upon generation. This will become clear later on in this chapter when adding samples to a reaction is discussed. Regarding the Products, their fields can only be modified to a limited extent to avoid misuse of the notebook. Products have a special treatment within the reaction, for example the analyses of the corresponding samples are stored and can be found in the Analyses tab.
A reaction can be populated with samples in two different ways:
- Create new sample:
Press in the corresponding categories Starting materials, Reactants or Products to create a new sample. Starting materials and the Products created this way will be added to the samples list. The Reactants will be saved as samples, and they are initially displayed in the samples list, but when the user saves the reaction and reloads the page, no Reactants are displayed in the list anymore in order to avoid unnecessary accumulation of samples. The Reactants samples are still accessible from within the reaction Scheme by pressing the reactant name. The Reactants can be selected from the drop-down menu Reagents, and they are also not added to the samples list.
The creation of samples does not directly result in a representation in the reaction scheme. Please save the reaction once after adding samples to it. After saving the reaction, all added samples also appear in the image of the reaction scheme.
To see a reactant displayed in the samples list, change its status from Reactants to Starting materials. By definition, Reactants are not displayed in the samples list.
- Select samples from the samples list:
Select samples from the samples list and drag and drop them by using the symbol next to its molecular structure or next to the sample name and place the sample in the reaction. To adopt only the molecular structure, use the symbol next to the molecular structure in the sample list for the drag & drop action. The internal process corresponds to the copy action. To carry out a reaction that uses existing samples, e.g. a subsequent reaction including a product from a previous reaction as starting material or a chemical from a chemical container, use the symbol next to a sample name in the sample list and place the sample into the reaction using drag & drop. A split of the sample is generated internally by the system (recognizable by the generation of the sample number). This applies only to the Starting materials as dragging and dropping of samples to the Reactants section does not add anything to the samples list. Splitting is not possible for products, as they always have to be recreated, but copy is possible.
Choose either the Starting materials or the Reactants as a reference using the Ref switch. As a result, the selected reference is automatically assigned an equivalent Equiv of 1.000. Several Starting materials and Reactants can be added, but only one sample can be marked as reference material.
Mass can be represented in g, mg or μg, the volume in l, ml, μl, and the amount in mol or mmol. Entering one type of data leads to automatic calculation of the others. The volume is calculated only if the molarity of the sample is already set (please set it in the properties tab of the sample, accessible directly by clicking on the sample's name -> sample panel opens), and the equivalents are calculated unless the sample is a reference, then it gets a fixed equivalent of 1.000. By entering the mass, volume or amount of the reference, the remaining information for the further samples is calculated as soon as at least either their amount or Equiv is given.
When entering the amount of a sample, users can choose a unit by pressing the unit button next to the number. Additional information on samples such as Molarity, Purity and others need to be added in the Properties tab of the Sample and cannot be added to the Reaction Table entry directly.
The calculation and display of the volume can only be correct if the molarity of the sample has been entered correctly and precisely in the sample.
An additional function is included within the reaction table, allowing to differentiate between reaction planning and implementation. The function can be found under the title T/R. means that users can enter/calculate inputs according to the reaction plan. After switching from , users can enter the quantities actually received. This function was created so that in the event of a deviation (e.g. due to accuracy in the dosage) from the planned experiments, the values of both procedures are still available.
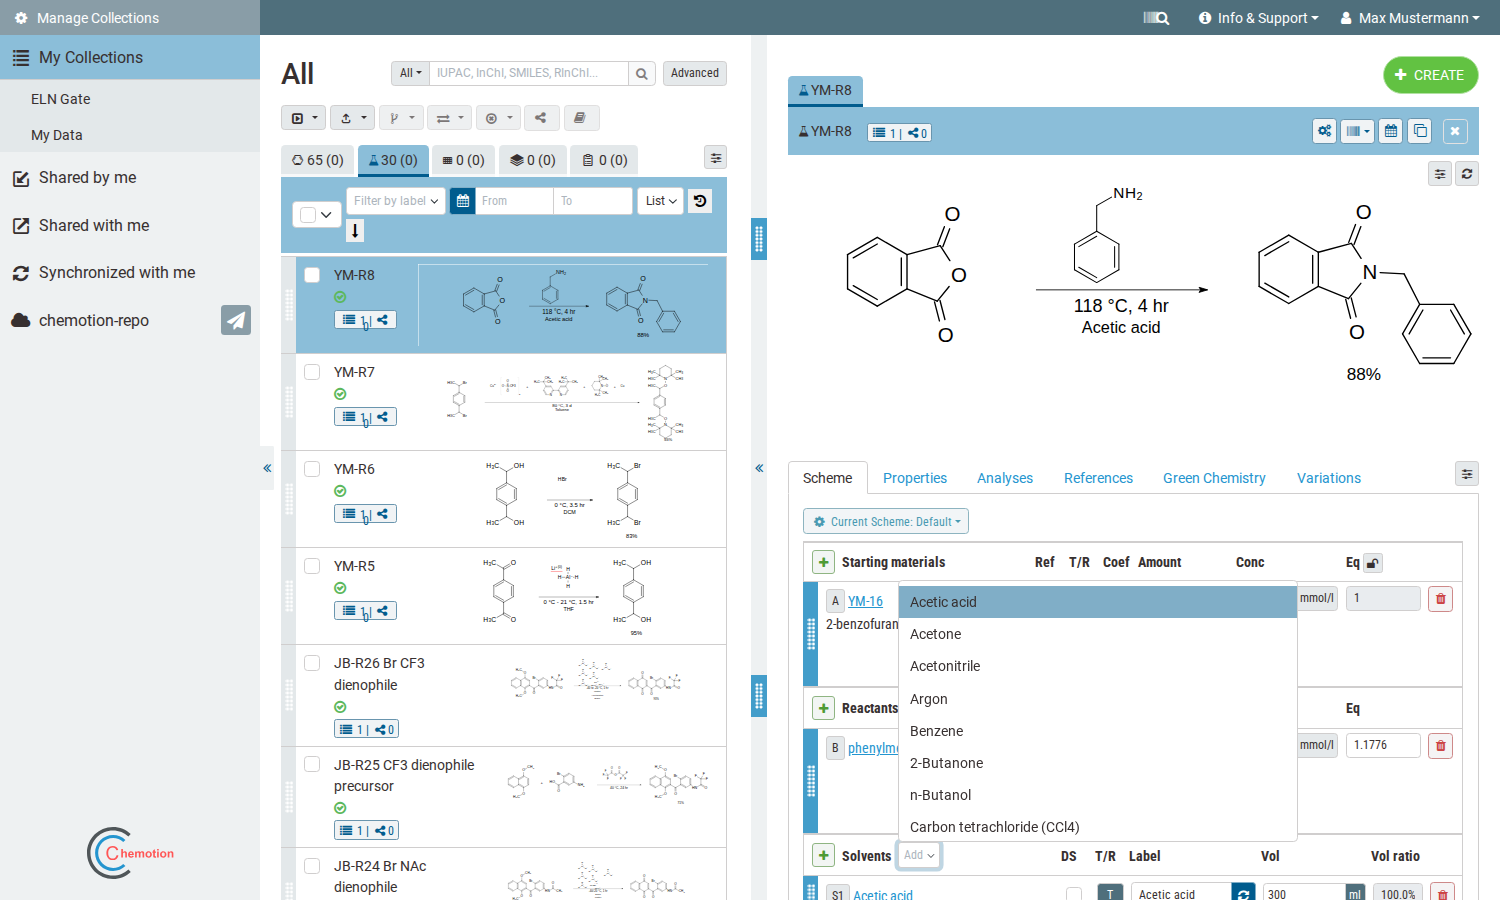 The solvents can be introduced by expanding the gray area Solvents. Pick a solvent from the drop-down Default solvents, or use a sample as a solvent. Solvents added as a sample are stored as a reactant sample, i.e. the solvent can be created with , but it is not displayed in the samples list. If the sample is already in the samples list, it can be dragged and dropped with , but no copy or split happens.
The solvent can be given a Label which is transferred to the reaction arrow when updated by the symbol . When specifying the solvents volumes Vol (in l, ml, or μl), the molarity of the reaction mixture Conc is automatically calculated based on the individual samples in the reaction table. Users can add as many solvents as desired. When more than one solvent is used, the volume ratio Vol ratio of the solvents to each other is displayed. Users can also distinguish between solvent details in the planned and implemented reaction with (planned) and (implemented). Samples and solvents in a reaction can be removed from the reaction using the button .
In the gray area Conditions, Select special conditions required for the reaction from a drop-down menu. Those conditions include UV, microwave, ultrasound, visible light. Other conditions can be added as free text in the text field.
Internal remark TODO: showing the conditions in a gif would be great
Below the Conditions area, specify a Name and describe it with a Status from a drop-down. The Status is reflected in the list of reactions by a symbol, so users can see their evaluation of the reactions at a glance. The following table shows all the possible Status and the corresponding symbols.
| symbol | status |
|---|---|
| planned | |
| running | |
| done | |
| analyses pending | |
| successful | |
| not successful |
The temperature of a reaction is specified via the Temperature field. If a Temperature has been defined, it is also displayed on the reaction arrow. When entering the temperature, users can choose between the Kelvin K, Celsius °C and Fahrenheit °F scale. Users can also enter a temperature profile by selecting the graph symbol for the temperature field . A window opens that allows users to enter temperature changes with time, and it displays those changes in a chart. Use "+" to add a temperature change and "–" to remove it.
Specify the Duration of the reaction by adding its Start and Stop in the following format: DD/MM/YYYY hh:mm:ss or DD.MM.YYYY hh:mm:ss. The Duration is calculated automatically. Users can also choose the current time with the button. The calculated Duration can be copied with , or rounded to the next field either in Week(s), Day(s), Hour(s), Minute(s), or Second(s).
The Type of reactions can be chosen from the Name Reaction Ontology drop-down. The selection of an ontology is required if the data should be added to the repository Chemotion, it is also recommended for all other reactions. Also, the Role can be assigned to a reaction. Available options are General Procedure, Parts of GP, and Single. The role is reflected in the reaction list and it is important for the use of the reporting function. The reporting function separates general procedures from reactions that were done according to a general procedure and reactions that are described as single (independent) reactions without assignment to a general procedure. For reactions that are Parts of GP (Parts of General Procedures), the description is not added to the report as it is assumed that the description of the reaction is the same for reactions done according to general procedures. In these cases, it is important to add the purification details to the field "additional information for publication and purification details" as this information is given in the report anyhow.
The Description field is intended for recording the reaction implementation.
For a quick overview of the Purification methods used to isolate the target compound, a drop-down menu Purification has been introduced. The methods Flash-Chromatography, TLC, HPLC, Extraction, Distillation, Sublimation and Crystallization are available. Purification Solvents can be added, and they are treated exactly the same way as the reaction Solvents. Description of the purification process can be included in the field Additional information for publication and purification details.
Finally, the reaction, without saving, or as an xlsx file.
Yield / conversion fields:
Users can toggle between the Yield and Conversion fields for products by clicking the header of this column (either Yield or Conversion) as shown below. Both fields are displayed as percentages. The yield percentage is calculated automatically, while the conversion percentage must be manually entered by the user. It is important to note that the Yield field is the default for this column, meaning users will need to manually switch to the conversion field if they wish to display it.
Properties tab
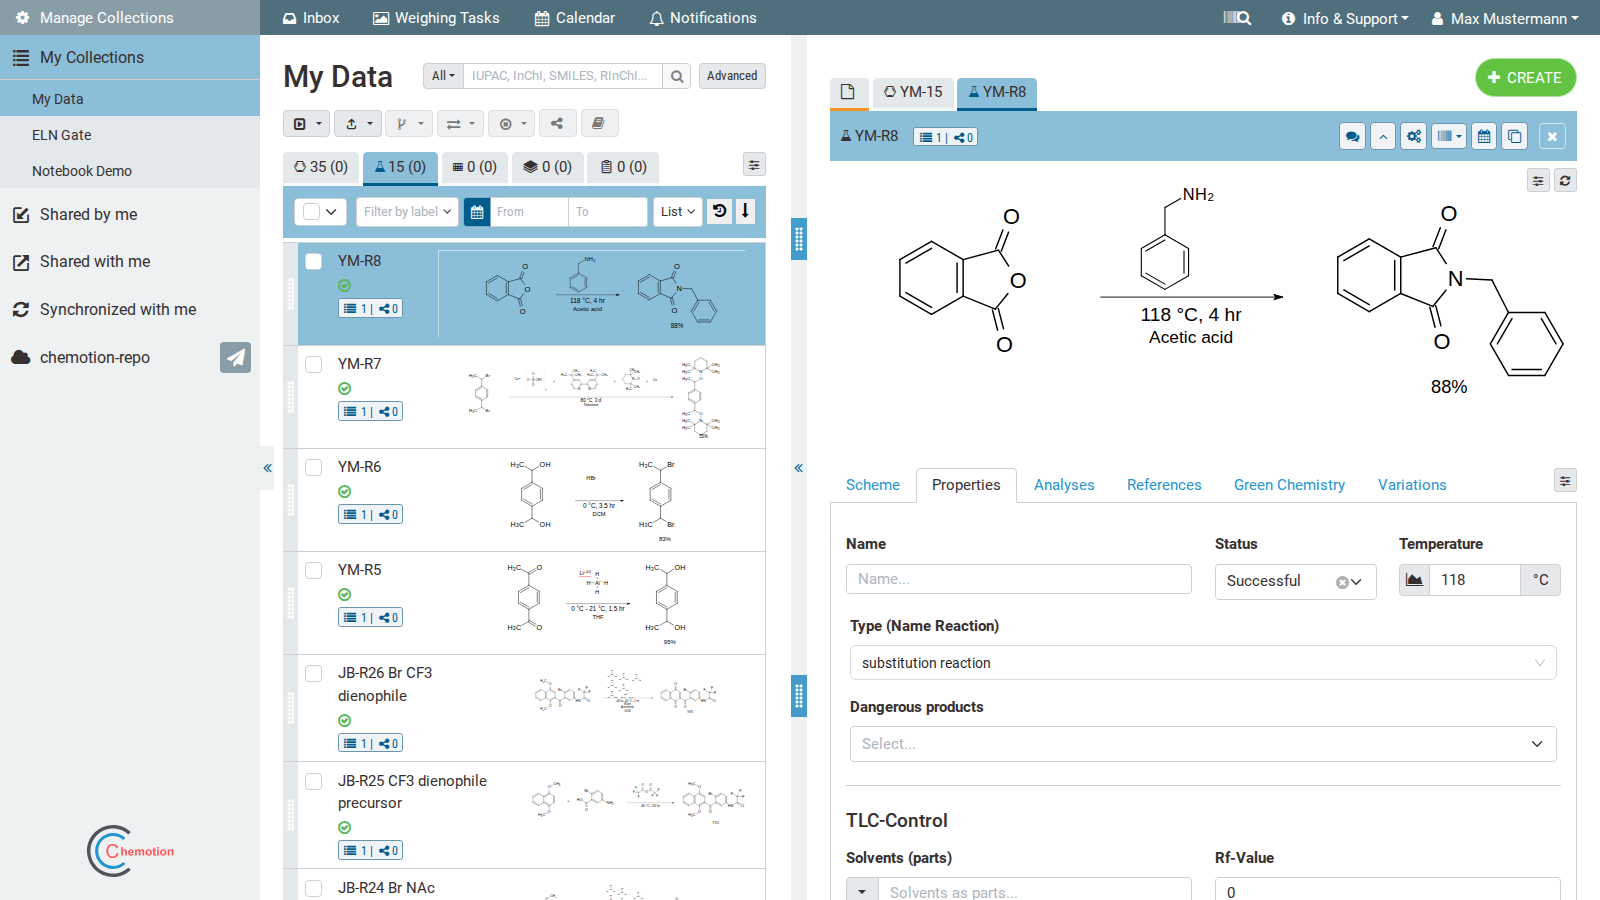
The Properties tab allows users to enter further details on the reaction. In addition to the fields Name, Status, Temperature, and Type (Name Reaction Ontology) that are also found in the Scheme tab, new fields are introduced such as Dangerous Products where users can list whether dangerous substances occur in the reaction and classify their hazard from a drop-down menu.
In order to be able to reproduce the control of a reaction via thin-layer chromatography, two fields have been developed which are supposed to store the solvents used and their ratio on the one hand, and the Rf value of the target product of the reaction on the other hand. Please enter the solvent information in the Solvents (parts) field followed by a space and the ratio of solvents to each other according to this example: ethyl acetate/hexane 2:1. Users can also provide further details about the thin-layer chromatography in the Description field, e.g. the shape of the spots or special features of the implementation. Users can also state how the compounds were identified, i.e. which staining solutions were used or which wavelength was selected for the UV detection.
Green chemistry tab
This tab contains fields for green chemistry metrics to quantify the environmental performance of the reaction. Those fields are Simple E factor (sEF), Complete E factor (cEF), Custom E factor, Atom economy (AE), Custom Atom economy. Those metrics are calculated automatically based on the masses of the samples in the reaction, and the waste produced through it. All the reaction samples are shown again in the Green Chemistry tab, with unmodifiable details about their Mass, Volume, Moles, and equivalents Equiv. To modify those fields, the user needs to go back to the corresponding sample and update the numbers, while the coefficients field Coeff can be modified directly from the Green Chemistry tab. Specify whether the Starting Materials and the Reactants are Recyclable, and whether the Products are Waste with a checkbox. If any problems occur with ticking the checkbox, make sure that Chrome is being used, and try to save the reaction and reload the page.
Variations tab
This feature is for recording multiple variations of a reaction.
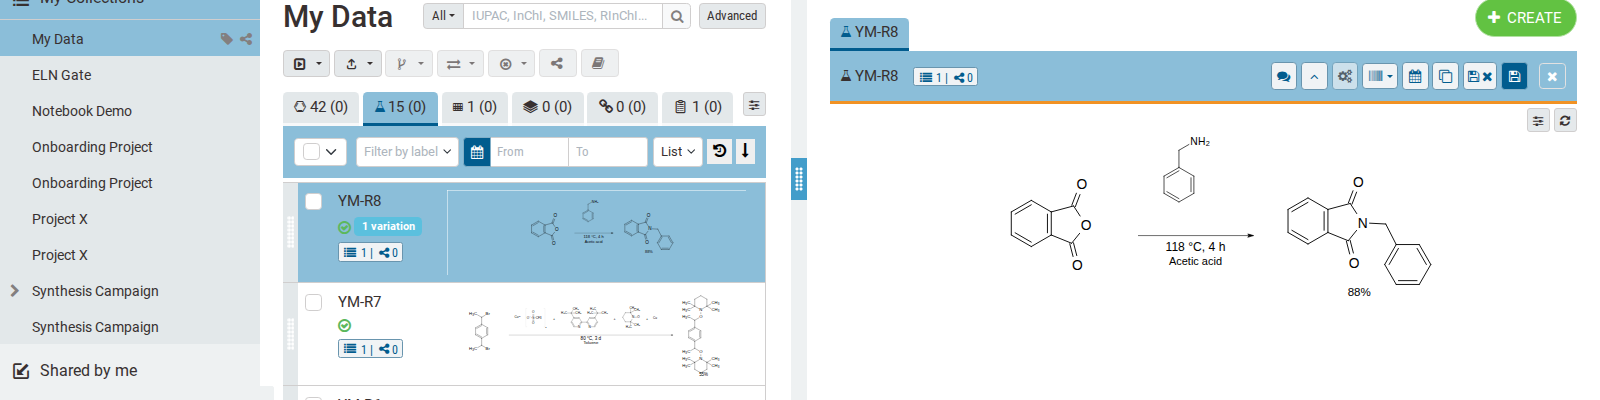
Here's an example of a variations table:
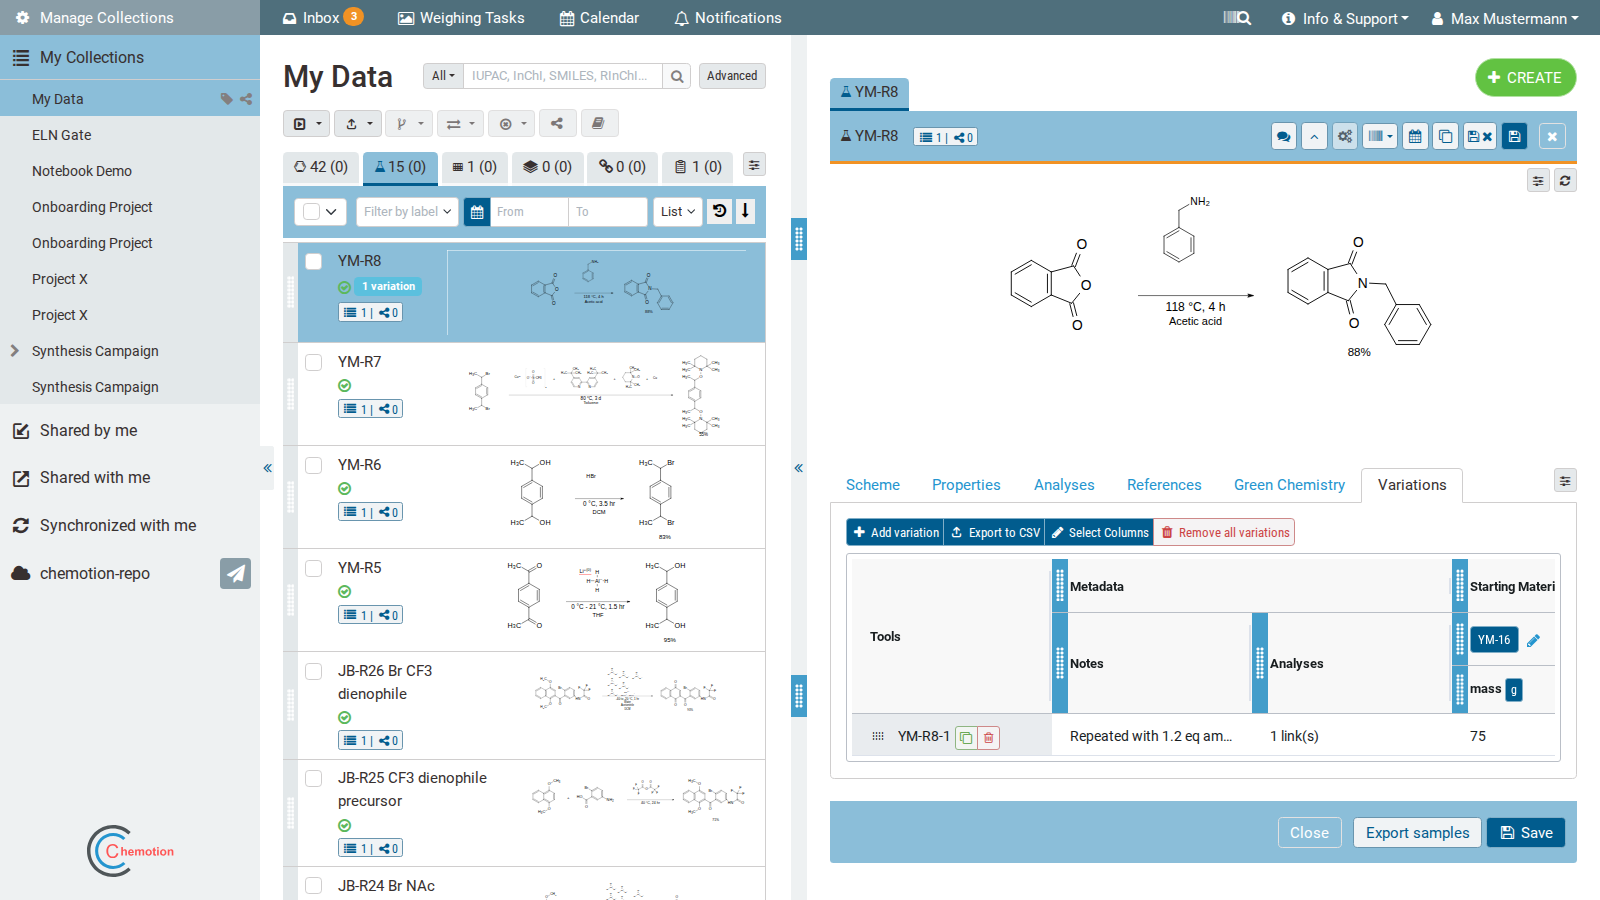
Each row represents a variation of the reaction.
For example, a user might have optimized a reaction regarding its duration,
or conducted a reaction with varying amounts of reactant(s).
The variations table facilitates recording a variety of experiments, such as catalysis, screening, or kinetics.
The columns in the variations table can be selected from the column selection modal (open the modal with ):
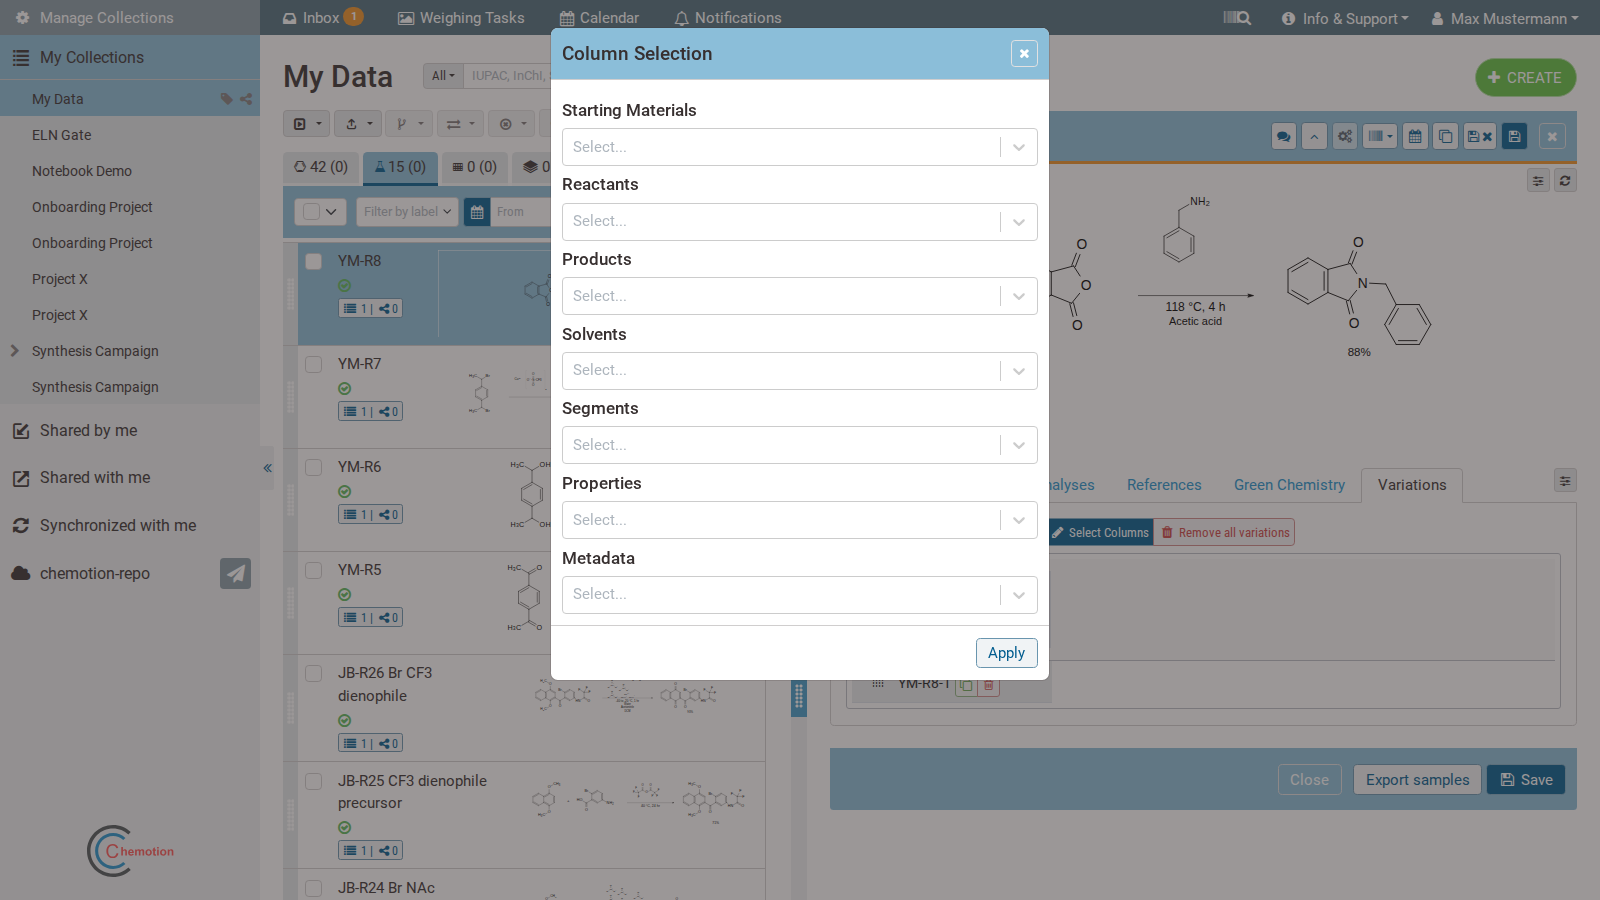
Whenever a material is added or removed in the scheme tab, the available materials in the column selection modal are updated accordingly.
Materials that are removed in the scheme tab are removed from the variations table as well.
When a user saves a reaction that has a variations table,
the reactions (and its samples) that are represented by the rows of the variations table are not saved individually.
Instead, the variations table is saved as a single data structure that "belongs" to the reaction.
That is, whenever a user exports the reaction, or includes it in a report, the variations table is included as well.
Adding, copying, and deleting reaction variations
Users can populate the variations table by adding, copying, and deleting rows.
Add a row by clicking the button on the top left of the variations table.
Each new row contains the current state of the scheme tab and properties tab.
That is, if something changes in the scheme tab or properties tab in between adding rows,
these changes will be reflected in any new row that's added after the change.
Note that changes in the scheme tab or properties tab aren't applied to existing rows in the variations table.
Changes in the variations table don't affect the scheme tab or properties tab.
Copy () or delete () a row by clicking the corresponding buttons that are embedded on its left.
Navigating and editing the variations table
Navigate the variations table with the arrow keys,
and edit a cell by double-clicking it,
or tab into the cell and hit enter.
After editing the cell, confirm the edit by hitting enter,
or leaving the cell (e.g., by clicking somewhere else, or hitting tab).
Cells that represent materials display additional, non-editable data when the user hovers over them with the mouse.
Linking analyses to variations
Each row in the variations table can be linked to analyses from the Analyses tab.
The Analyses tab contains analyses pertaining to
A) the reaction's product(s) (left sub-tab), as well as
B) to the reaction in general (right sub-tab):
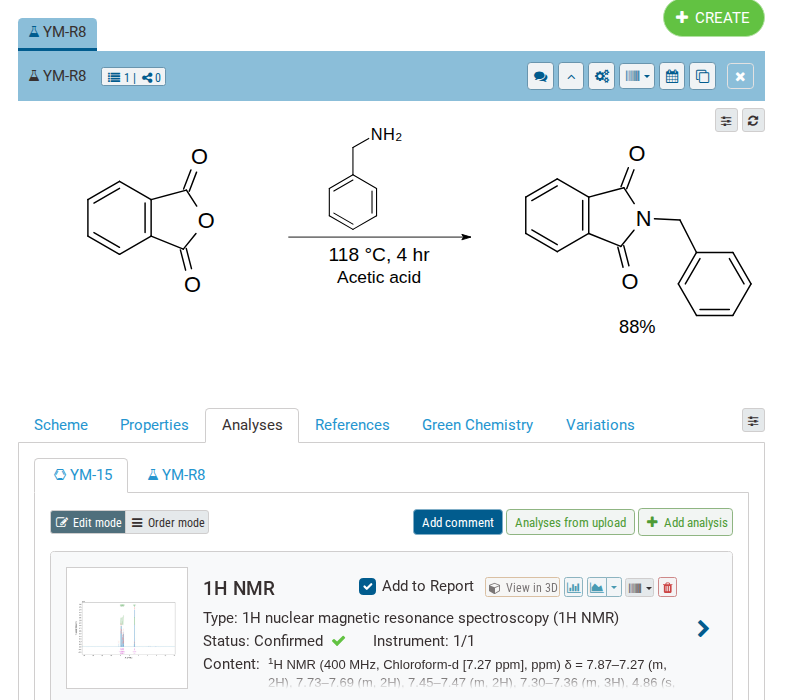
Variations can only be linked to B), and for the remainder of this section, any reference to an analysis refers to B).
Users can link analyses with a variation by clicking on a cell in the Analyses column (add the Analyses column from "Metadata" dropdown in the column selection modal).
Clicking on the cell opens the following menu:
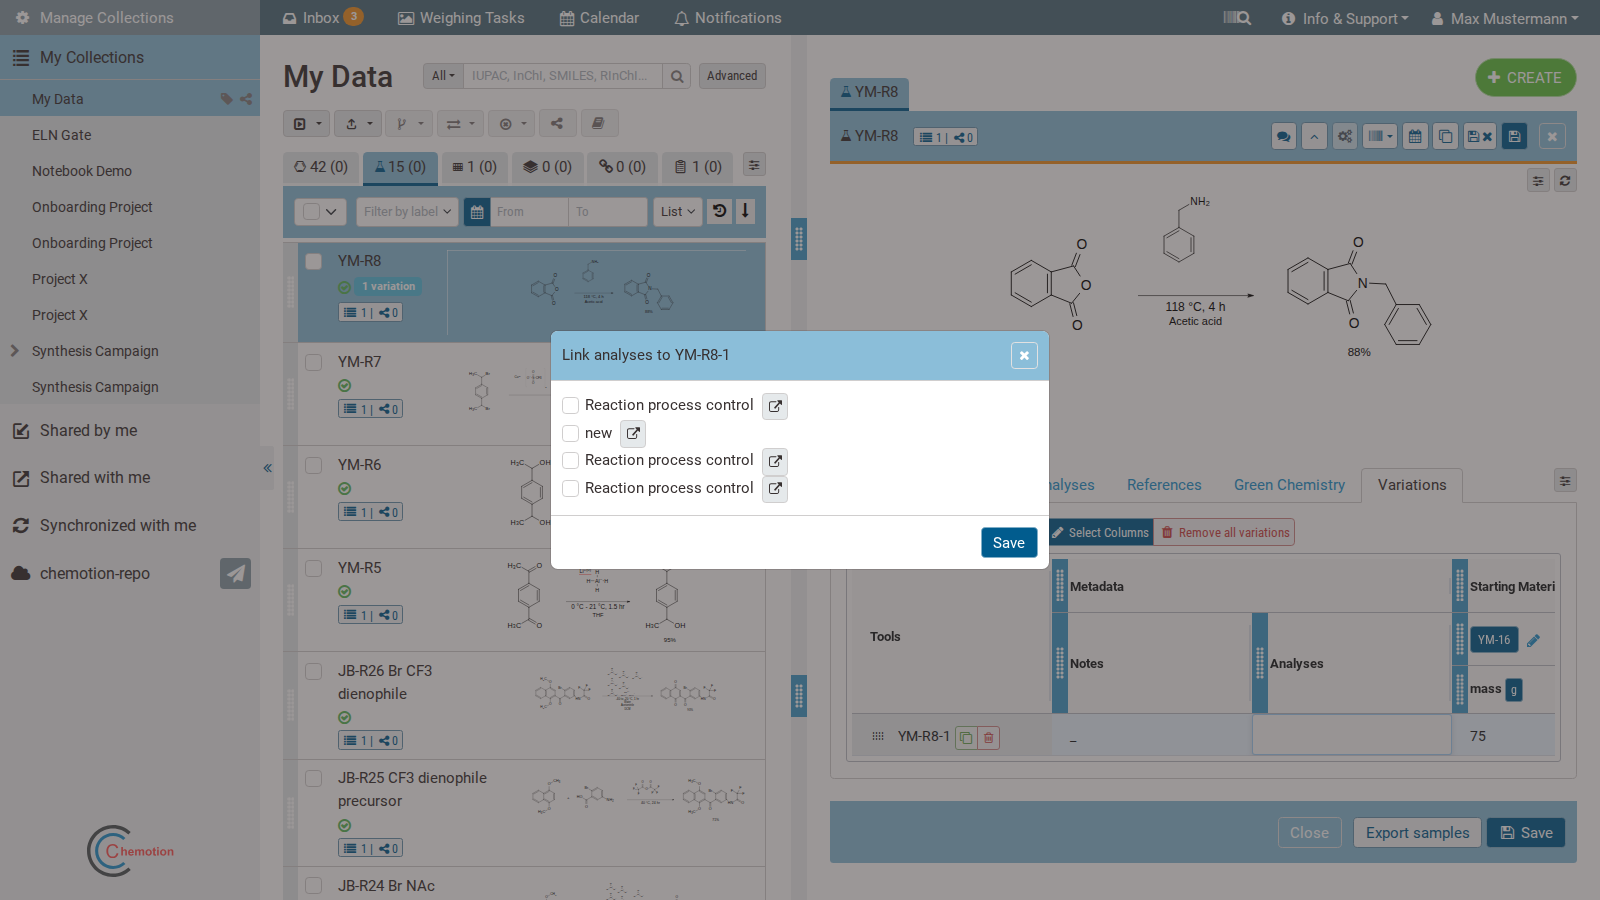
The modal shows all names of (saved) analyses from the Analyses tab.
Check the box next to an analysis name to link this analysis to the variation.
Users can jump to the analysis by clicking the button. Finally, users can save the links with the button, which also closes the modal. After closing the modal, users can view the names of all linked analyses by hovering the mouse over a cell in the Analyses column.
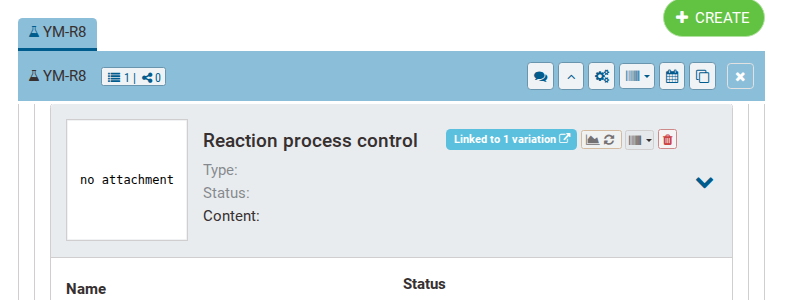
After linking an analysis, the corresponding entry in the Analyses tab displays a badge
containing the number of linked analyses:
Adding notes to variations
Each row in the variations table can be annotated with notes (add theNotes column from "Metadata" dropdown in the column selection modal).
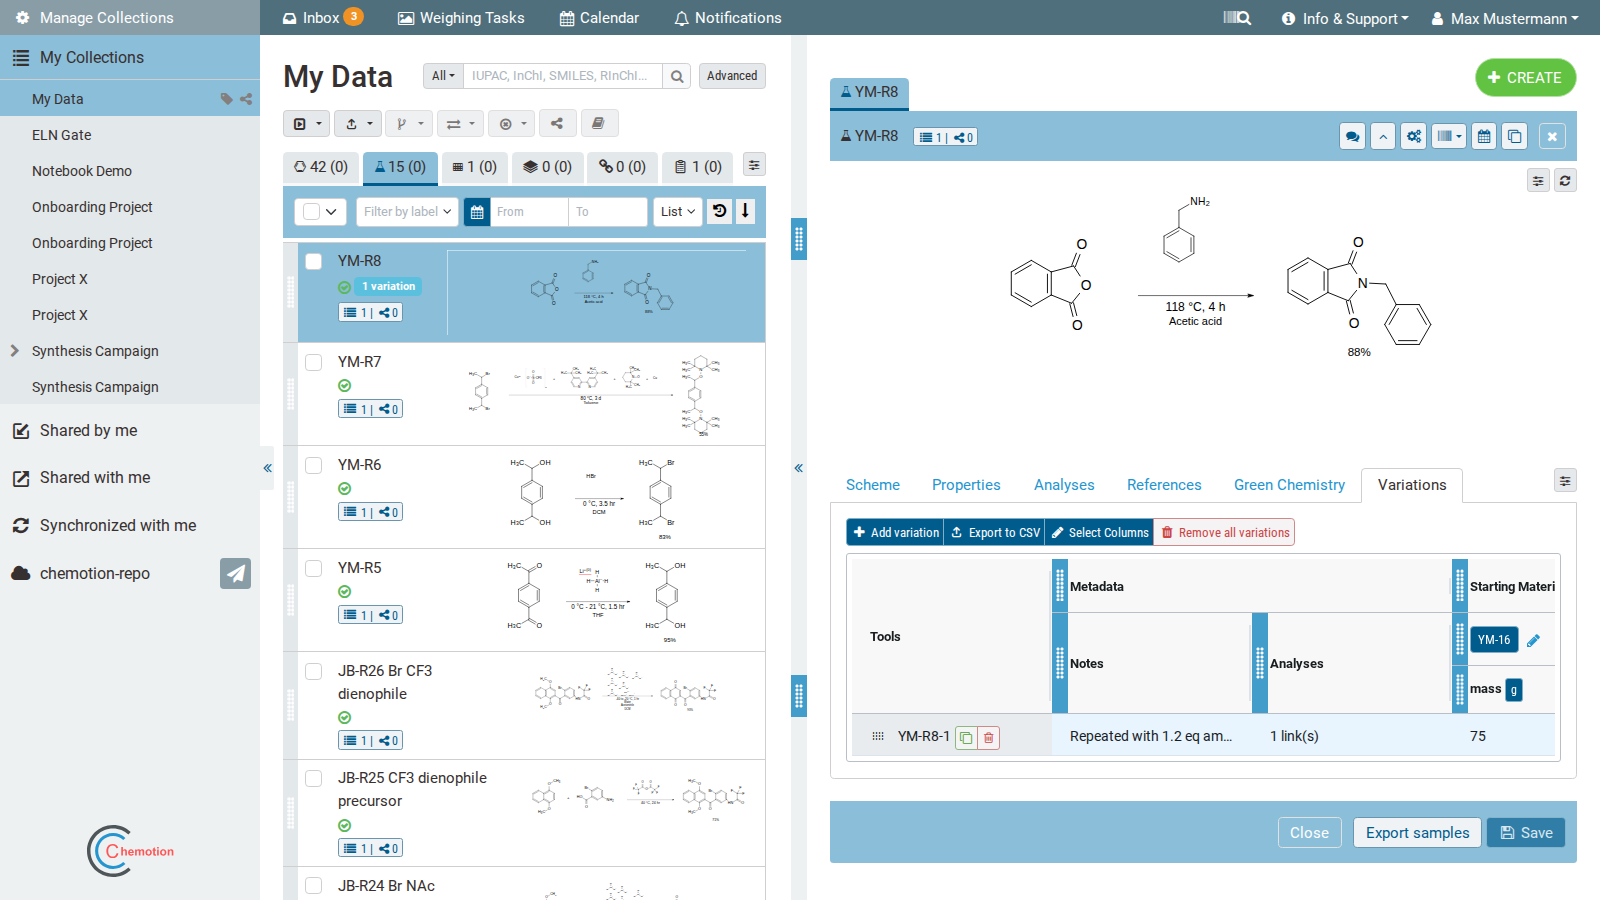
A note is a text that can be up to 1000 characters long. A note is text-only, meaning it cannot include images. To edit the note, double-click the corresponding cell, or tab into it and hit enter, which will open a text editor.
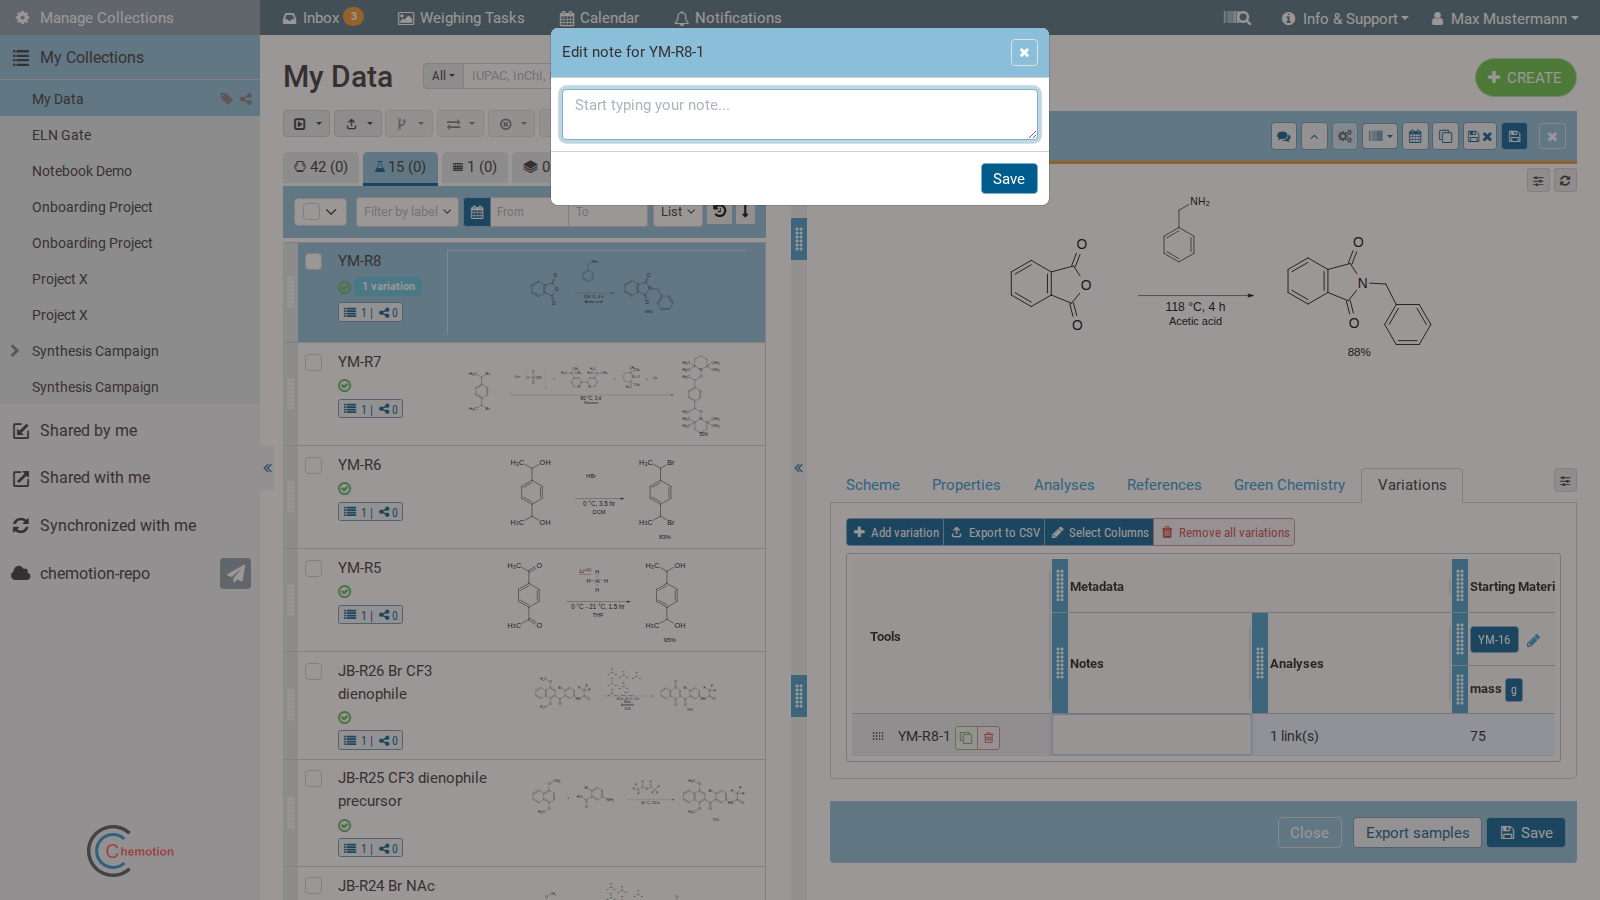
Users can finish editing by hitting enter again.
Customizing the table layout
Columns
In case not all columns fit on the screen, users can move to columns that are currently off-screen by using the horizontal scroll bar at the top of the tab. To change the order of columns, click on a column header and drag it to the left or right.
Material names
Click on material names to change them.
Entries
Columns can represent one or more entries. For example, a material column can represent the material's mass, amount, volume, and equivalent. Users can configure which entries to display with the button, which opens the following modal:
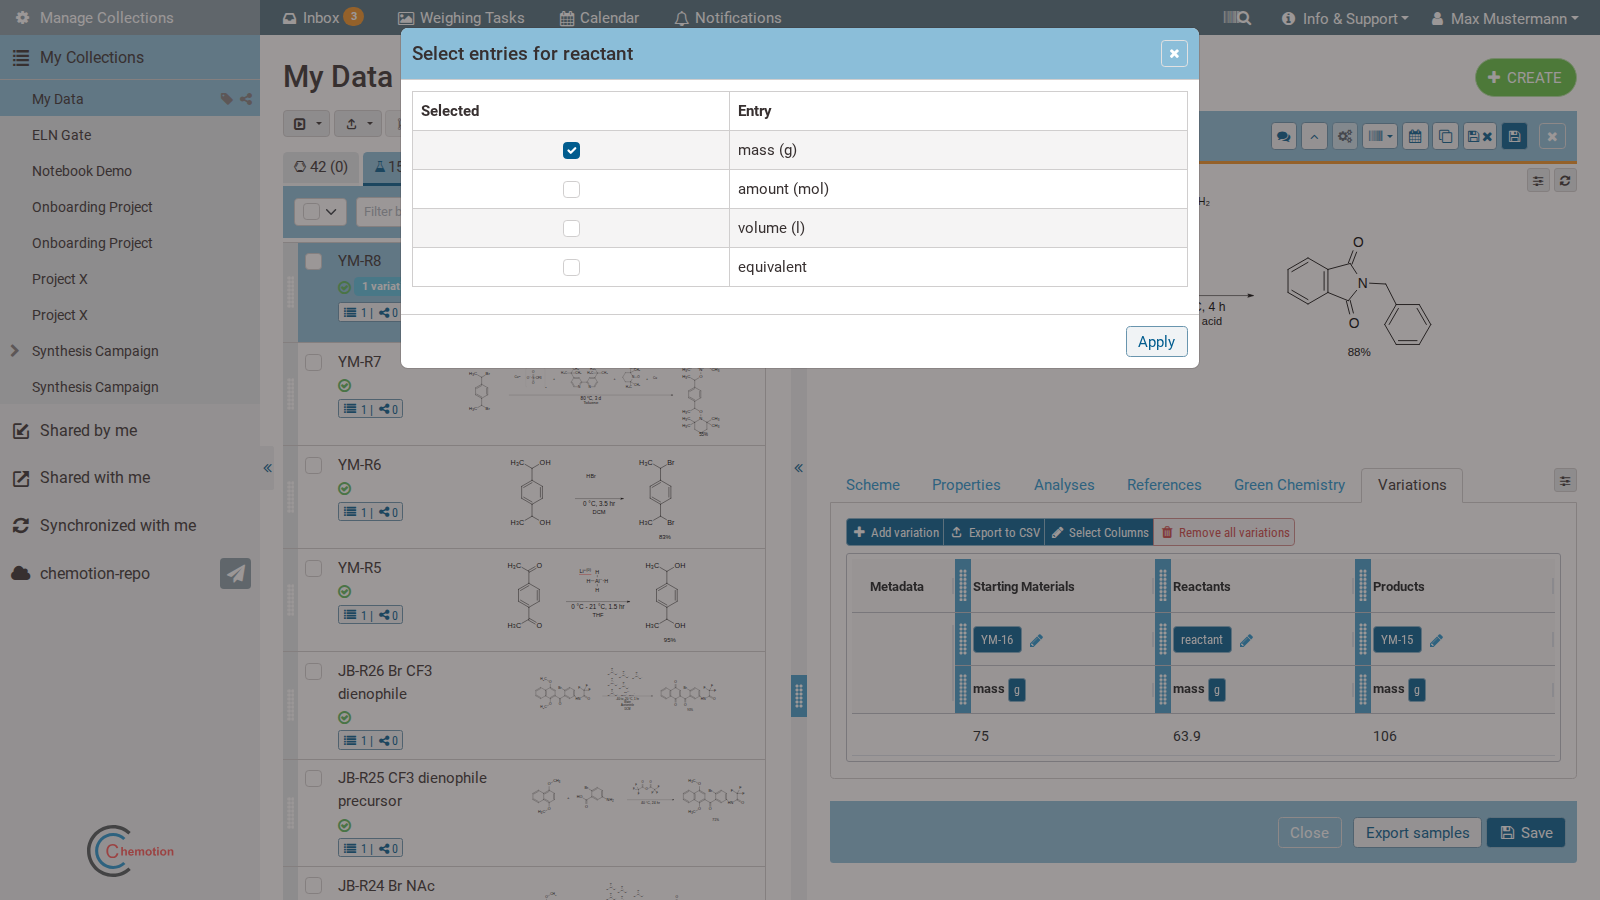 Select one or more entries to display, along with their units (if applicable).
Note that one entry must always be the "Main entry", i.e., the entry that is editable and sortable.
Select one or more entries to display, along with their units (if applicable).
Note that one entry must always be the "Main entry", i.e., the entry that is editable and sortable.
Rows
Click on the sort icons in the column's header to sort the rows by that column. Sort the rows by a column in ascending () or descending () order. To remove the sorting, click . Users can also sort rows manually: click anywhere on the row and keep the mouse button depressed while dragging the row up or down. Note that the manual sort is disabled as soon as the table is sorted by a column.
Search CAS
Please refer to Search CAS.
Details panel for wellplates
Designer tab
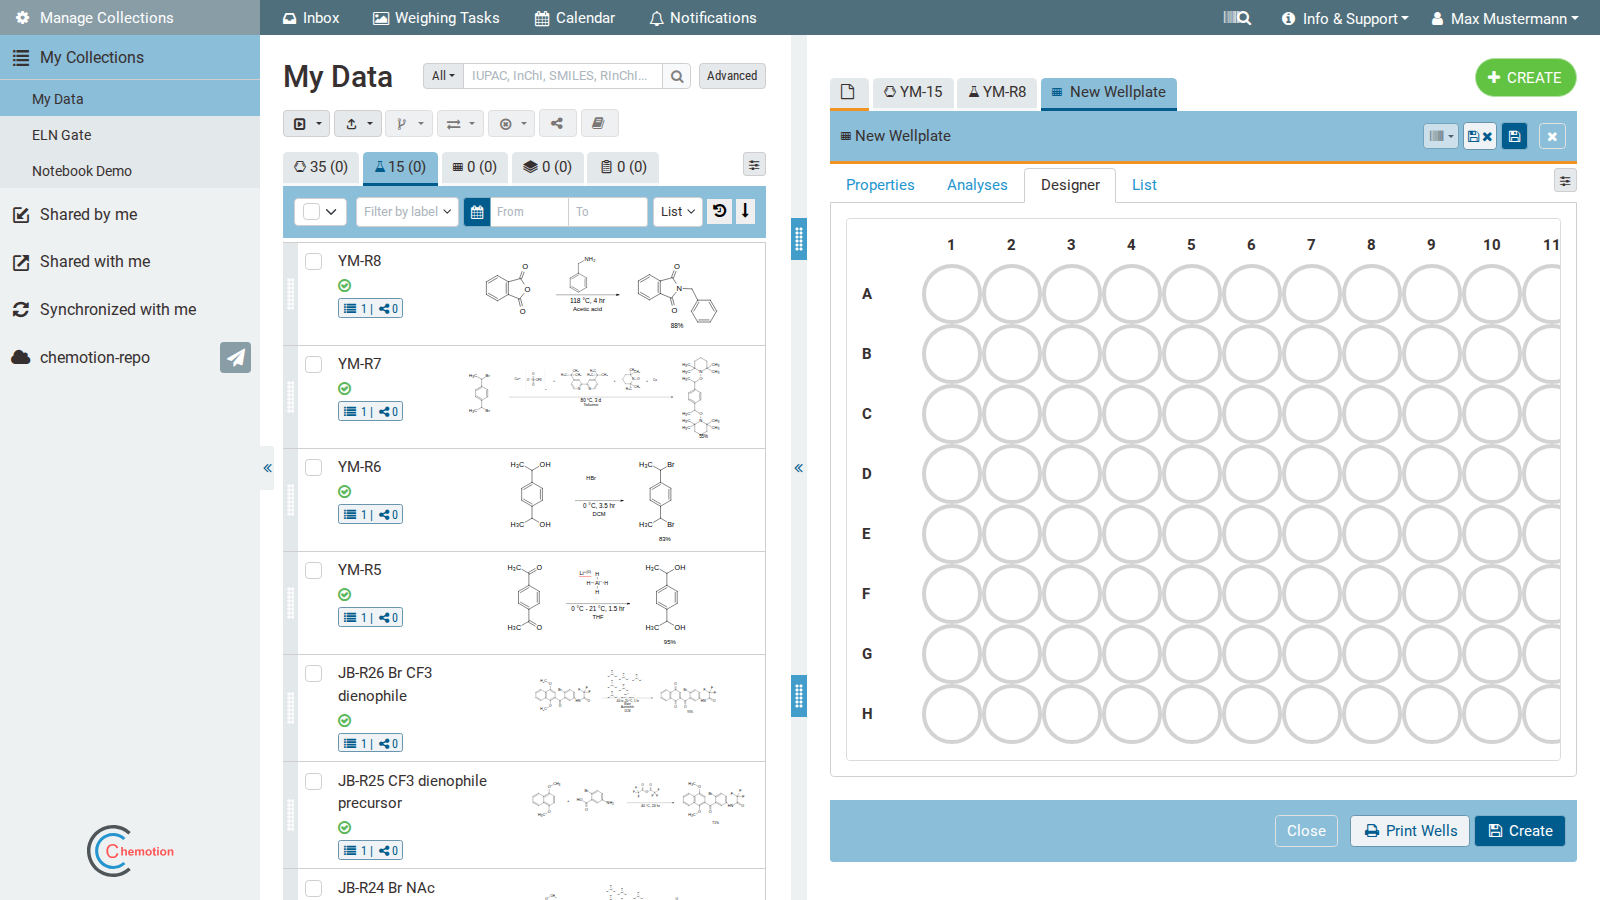
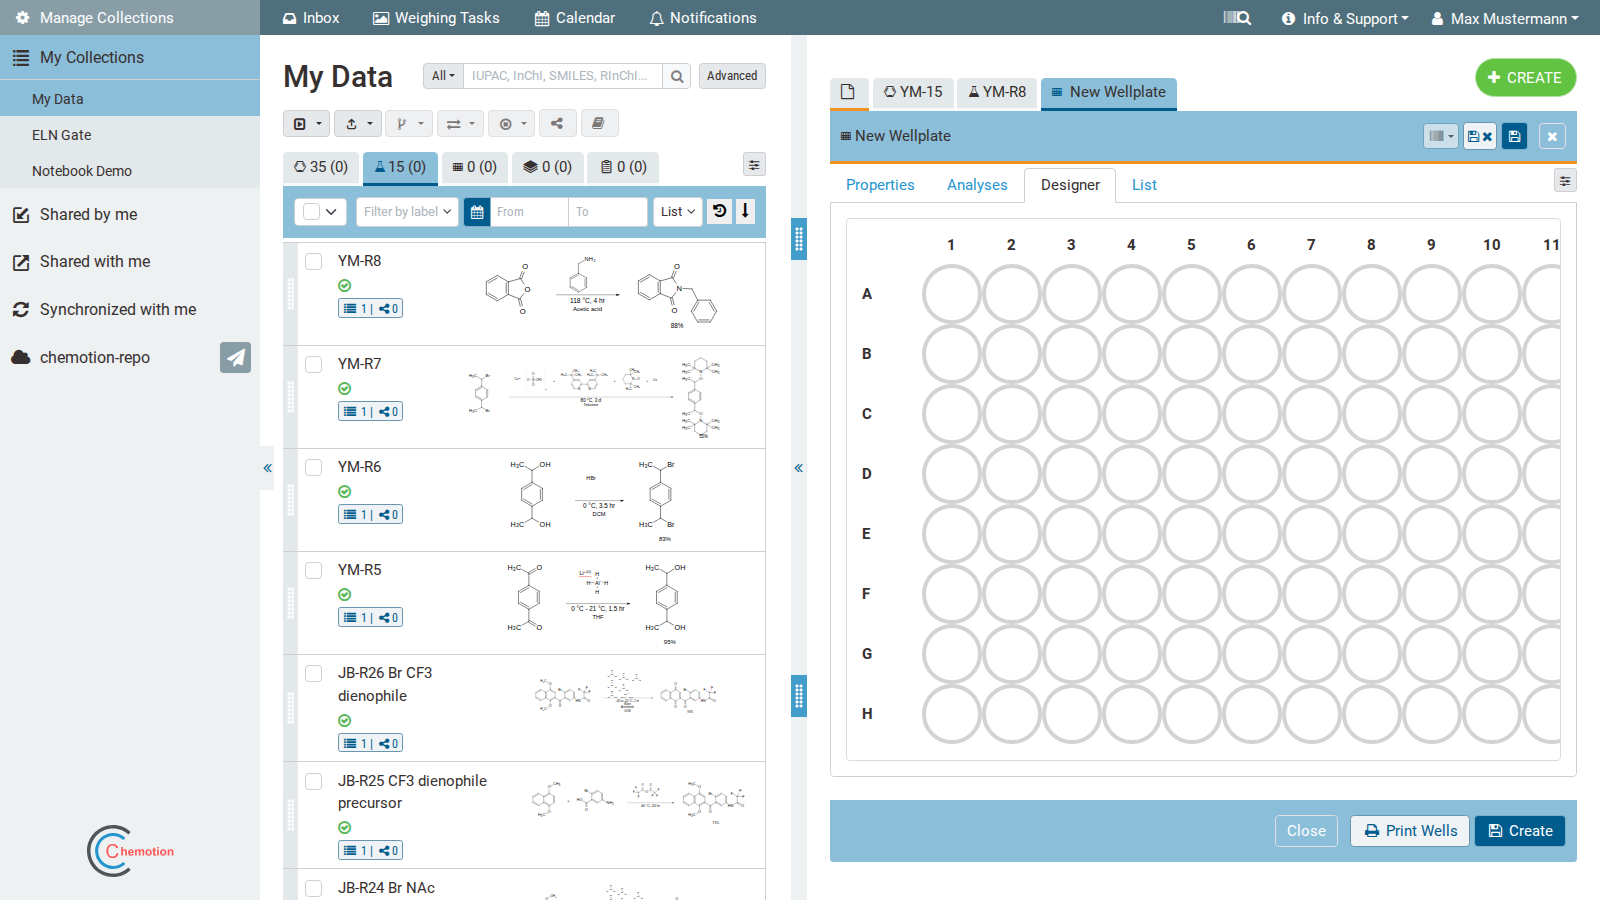
The Designer tab graphically displays the wells and shows how they are filled with samples. Since the representation of the individual samples may not be sufficient for some applications due to the limited space, it can be enlarged by selecting the appropriate well within the designer, which provides insight into selected information on the underlying samples and their sample number, Readout and Imported Readout. It also enables deleting the sample from the wellplate with the button . The Readout field can’t be edited from within the Designer tab, but rather from the List tab, while the Imported Readout can be edited from within the sample’s details panel from the Results tab.
List tab
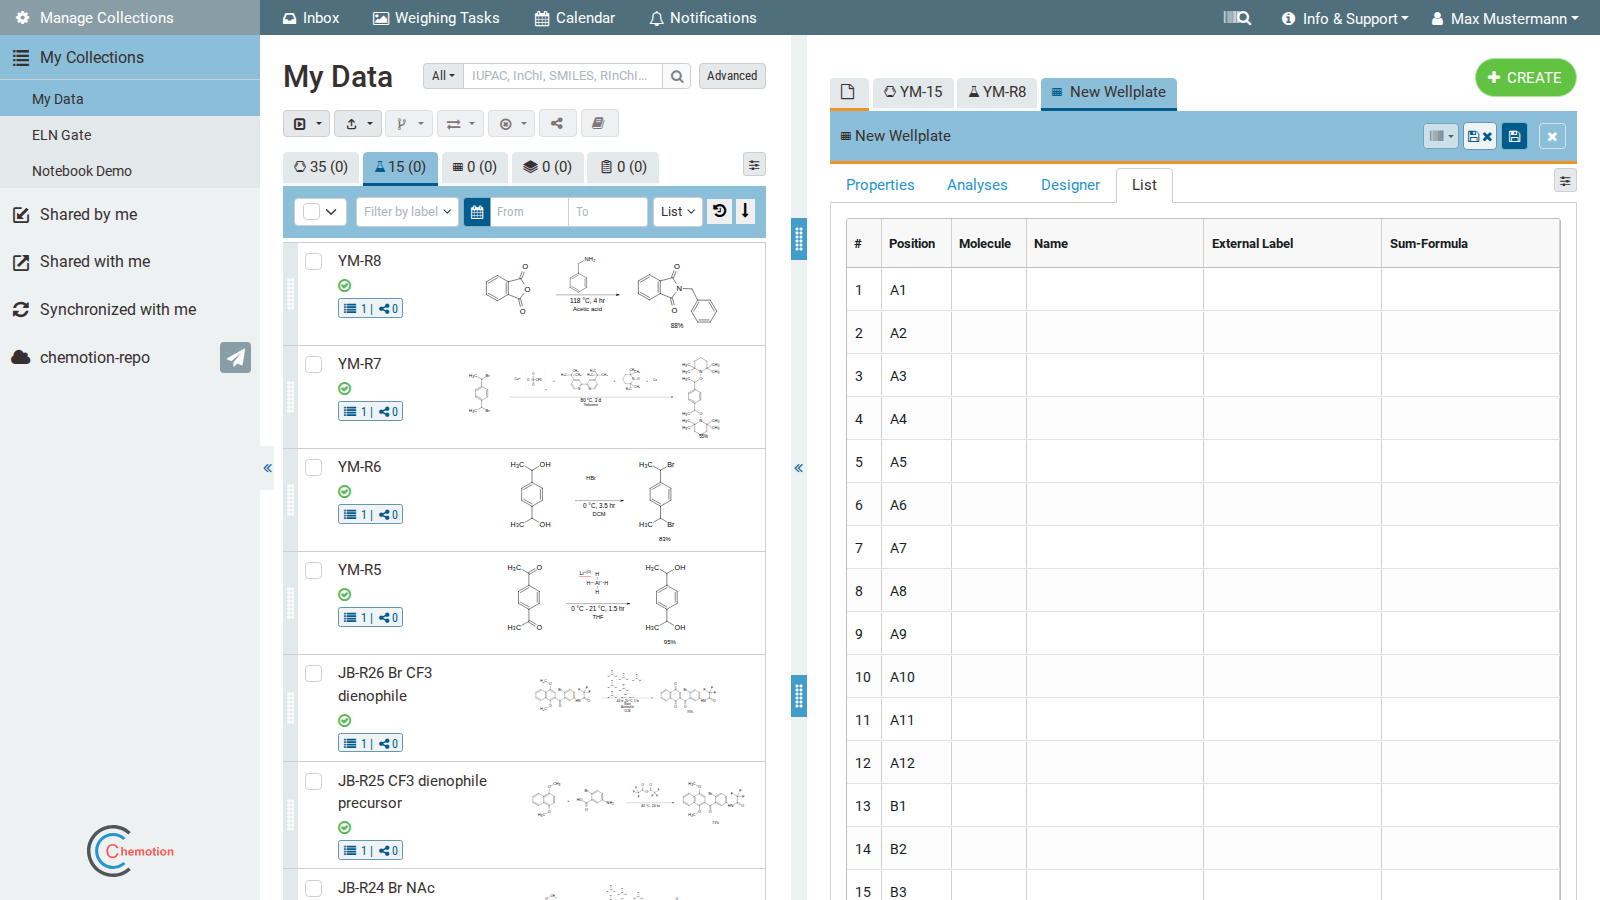
The List tab can be used to organize the samples collected in the wellplate. All inserted samples appear automatically in list form according to their assignment in the Designer (Position). The table of the list also contains the information about molecular structure (Molecule), Name, External label, Sum Formula, Readout and Imported Readout. The Readout field values are displayed again in the Designer tab when selecting individual wells.
Properties tab
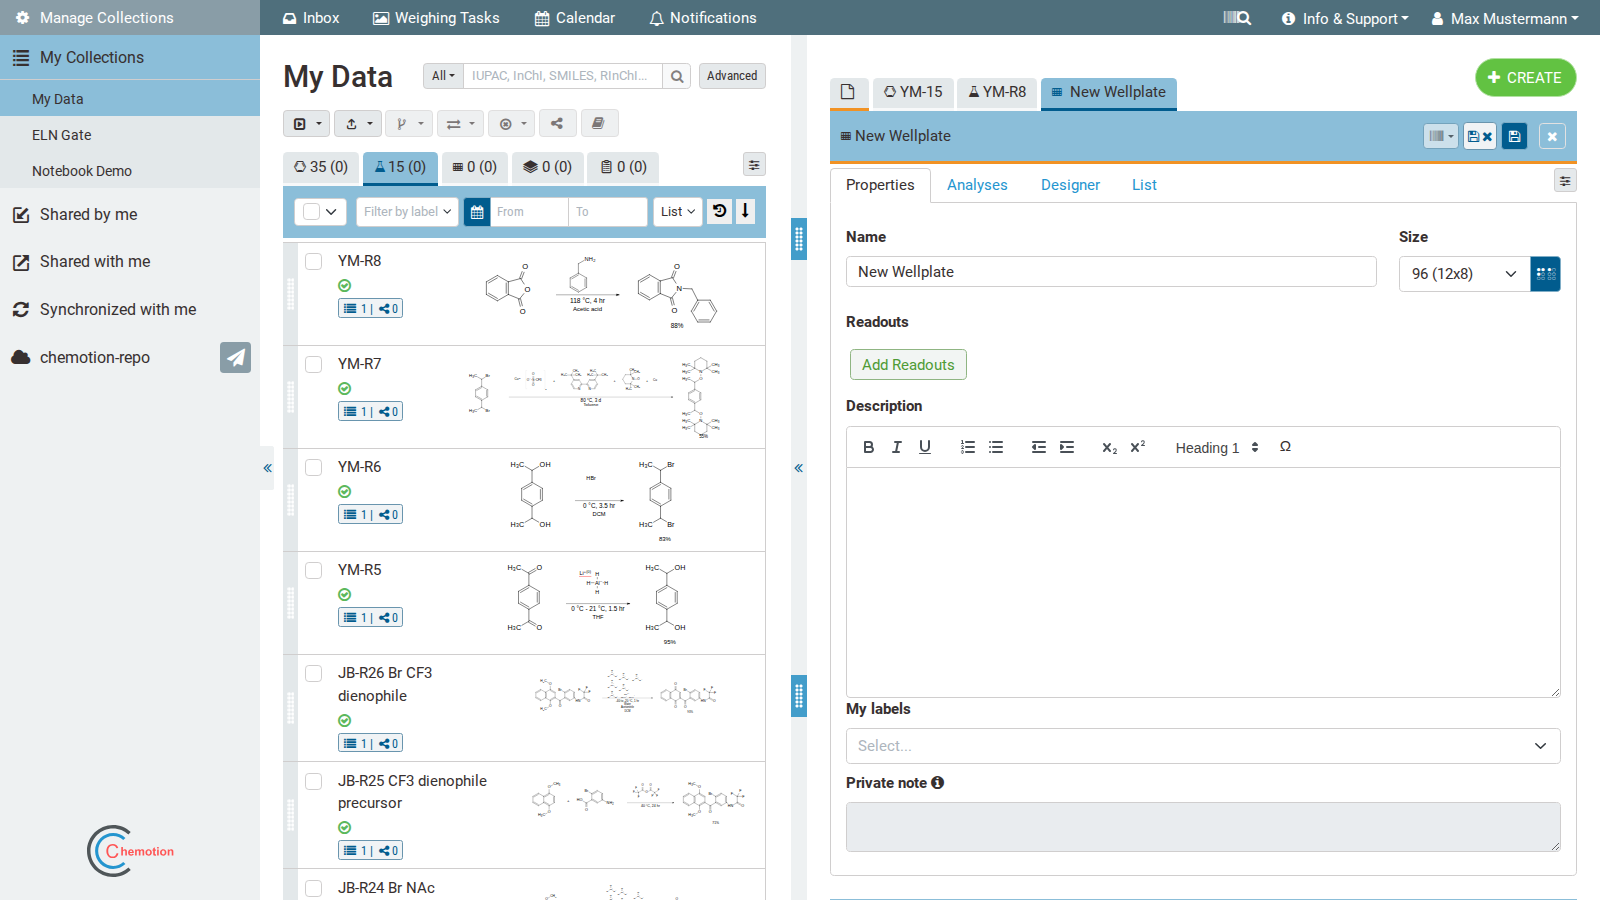
The Properties tab allows users to enter additional information about a wellplate, such as a Name, its Size (which is fixed as 96 at the moment) and a Description.
Detail panel for screens
In the future, it should also be possible to use the Chemotion ELN for the documentation of biological experiments. The structure of this biological work should be possible through the element Screen. All descriptions and procedures of biological work for a planned experiment are recorded on a screen while the wellplates define the localization of the substances and materials used. Wellplates can therefore also be assigned to the individual screens in order to make their affiliation clear.
So far, only a rudimentary structure for entering the screens has been programmed. The further development is an important task within the project in the coming months. The most important data of a biological study can be saved by entering free text in the Name, Collaborator, Requirements, Conditions, Result and Description fields. The allocation of the wellplates required for the examination can be done via drag & drop directly under the heading Wellplates. The selected wellplates are added and directly available through a link.
Detail panel for research plan
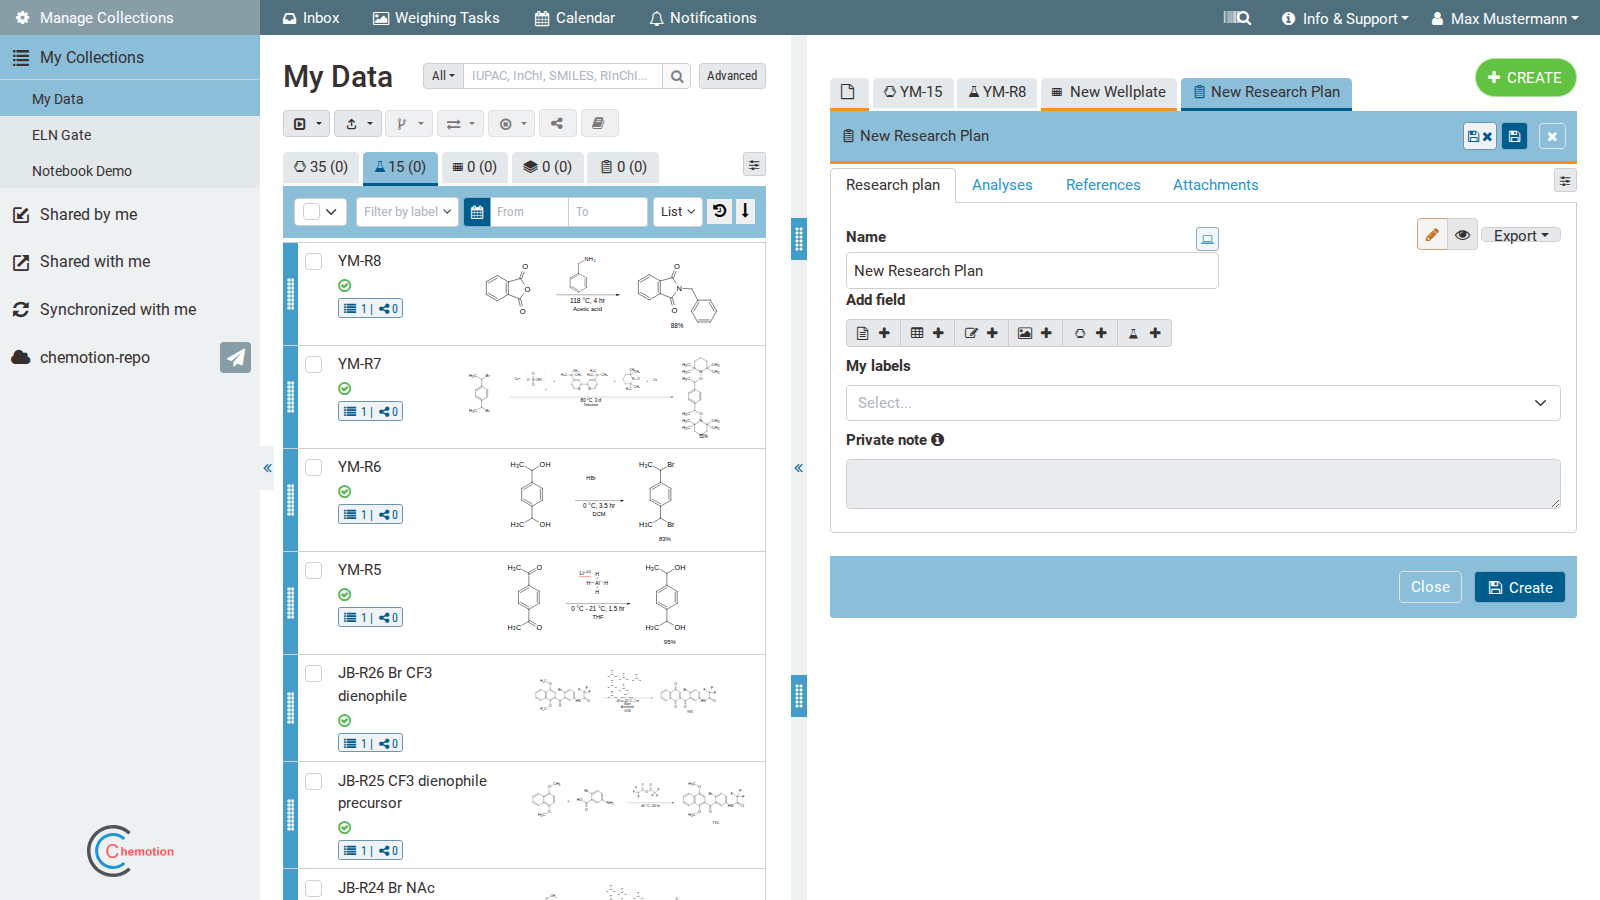
A research plan is a generic element that can be used in a flexible manner to describe a particular process. The research plan contains a Name, and there are plenty of fields that can be added in the form of text (Add Text Editor), tables (Add Table Editor), images (either a molecular structure with Add Ketcher Editor, or a regular image with Add Image where users can control its Zoom). Users can add other elements such as samples (Add Sample) and reactions (Add Reaction) with drag and drop. The order of the segments added to the research plan can be changed by drag and drop.
The research plan has an edit and a view mode. The view mode offers options to export the information to different file formats (.docx, .odt, HTML, Markdown, LaTeX).
Internal remark TO DO: gif showing export functions
Research plan table functions
Add/remove columns and rows
Users can add or remove columns and rows by right-clicking on the table body, then choosing the desired action.
Reorder/sort columns and rows
Reorder:
-
Users can reorder rows by clicking on the icon in each cell and drag-drop. (Rows cannot be reordered when in sorted mode.)
-
Users can reorder columns by clicking on the respective column header and drag-drop.
Sort:
- Users can sort by column by clicking on the column header.
Rename columns
Users can rename columns by right-clicking on the column cell and choosing 'Rename column'; the rename popup will appear. Then input the new name and click the 'Rename column' button.
Manage table schemes
-
To store a table scheme:
-
Click on 'Table schemes' button.
-
The 'Table schemes' popup window will appear.
-
Then input the scheme name and click 'Save' button.
-
-
To apply a table scheme:
-
Click on 'Table schemes' button.
-
The 'Table schemes' popup window will appear.
-
Click 'Use' button to apply the table scheme name.
-