Inventory
Available from ELN v1.1.1 onwards: Using the inventory collection with different users that can move items into or create items in the inventory. Available from ELN v2 onwards: Importing storage temperature, expiration date, and volume fields for chemical samples. Available from ELN v4 onwards: Adding, editing, and removing safety phrases (H- and P-statements, GHS pictograms) manually in the inventory tab.
Creating Inventory for a Group
Creating a chemical inventory that can be accessed by all members of a working group requires four steps:
- creating a new user,
- creating a collection in that user's Chemotion ELN and adding all chemicals to that collection as samples,
- creating a new group or adding the account to an existing group and
- synchronizing the collection with the group.
After creating an inventory, one can proceed to creating entries in it.
Creating a new user
A new Chemotion ELN account should be created to manage the chemical database. All new chemicals will need to be created by that account (usually that account is managed by the person in charge of ordering chemicals or receiving the group's chemicals). Once a chemical has been created in that account as a sample it can be edited by any group member (for example to update the amount left in the bottle), if the collection is shared with the right privileges (more on this in the section synchronizing the collection with the group).
The registration process of that account is identical to registering any other new Chemotion ELN user.
Creating a new collection
In the newly created account, a collection has to be created where all chemicals can be inserted as samples. If the group is located in different buildings, or uses different chemical subsets, multiple collections can be created for the different buildings or subsets. Each collection can be shared with one or more groups independent of one another.
Once the collection is created, the chemicals that are part of the database have to be created as samples. Importing a database is possible using the import samples to collection function of the Chemotion ELN. For that purpose, an XLS or XLSX Document in the right format and containing all chemicals to be imported, must be available.
It is advisable to create the samples with all relevant information in the Properties tab, such as CAS number, concentration or molarity, density, etc. However, the information can be updated later by other users, if it is shared with the group with write access (more on this in the section synchronizing the collection with the group).
Creating a new group
It is advisable to share the collection containing the chemical database with a group, not with individual users, as it makes management easier. The group does not have to be created by the same account managing the chemical database. However, both can be also managed by the same account.
To create a new group, choose My groups and Devices from the drop-down menu on the top right corner by clicking on the account's name next to the sign-out button.
Now proceed to create a new group and then add all group members who should have access to the database of the new group. Multiple groups can be created, if different collections, containing subsets of the chemical database, are to be shared with different group members.
Note that only the person who created the group, or the account the administrator rights were transferred to, will be able to manage group members.
Synchronizing the collection with the group
In the collection settings, the collection containing the chemical database can be synchronized with the group. Please be sure to choose the sync-rights appropriately when synchronizing the collection. Be aware that the chosen sync-rights might limit the ability of group members to update sample properties such as amount of chemical left, storage location, concentration or molarity, etc.
Creating Chemical Entry
There are three ways to create an entry in the inventory:
Creating a new sample
A chemical Entry can be created by creating a new sample as an inventory entry. Please refer to Generate Sample section, to learn how to create a new sample. Once a new sample is created, the user can check the inventory check box to enable handling of a sample as a chemical entry.
Splitting sample for chemical entry
The process of creating a chemical entry in the Electronic Laboratory Notebook (ELN) involves initially creating a sample.
However, users also have the option to generate a new chemical entry through the Split Sample feature.
For further information on how to utilize this feature, please consult the Split Sample section.
When a split sample is performed, the newly generated chemical entry inherits the data from the original entry.
Subsequently, users are able to modify the data according to their specific requirements.
Drag and drop chemical entry
Users have the capability to employ a drag-and-drop action to transfer a chemical entry from the inventory list to a reaction, thereby generating a subsample derived from the original chemical entry. In this process, only safety information pertaining to the subsample is generated. Subsequently, users can conveniently navigate to the inventory tab of the created subsample to access and review the corresponding safety information. The gif below illustrates the drag-and-drop action for the generation of a subsample from a chemical entry.
Managing Inventory
The inventory tab will appear in the Tabs Layout. The user can make the inventory tab visible by drag and drop, if it is hidden by default. Once the inventory tab is active, the user can start entering chemical data in the corresponding fields.
** The inventory tab is organized into a hierarchical structure consisting of three collapsible lists, outlined below: **
This structure enables convenient navigation and organization of data for a chemical inventory entry.
Inventory Information List
This section contains the following fields:
status:List of 4 options for status of the chemical (available, out of stock, to be ordered, and ordered).vendor:The vendor associated with the chemical order.order number:The order number of the chemical.price:The price of the ordered chemical.person:Contact person associated with the chemical.required date:The date when person or entity required the chemical.ordered date:The date when the chemical was ordered.expiration date:The date given by vendor when the chemical will expire.required by:The person or entity that required or ordered the chemical.amount:Specifies the amount of the chemical, with unit (mg, g, or μg).volume:Specifies the volume of the chemical, with unit (l, ml, or μl).storage temperature:The temperature in Celsius given by vendor at which the chemical should be stored.
Safety List
-
The Safety section is an interactive feature that allows users to search for and access safety data sheets (SDS) and safety phrases related to specific chemicals.
-
Users can select the vendor associated with their query, choosing from the drop-down list options such as All, Thermo Fischer, and Merck. Selecting "All" will search for SDS on both vendors' websites.
-
The button provides a dropdown list for users to select whether to search using the CAS (Chemical Abstracts Service) number or common name of the chemical.
-
The dropdown list offers three language options: English, German, and French. If no results are found with the chosen language, results will be displayed with the default query language (English).
-
After selecting the search parameters, users can initiate the search query by clicking the button.
-
The search results will be displayed, and users can click on the results tag link to open a new tab directing them to the vendor's safety data sheet.
-
It is recommended for users or administrators to first verify if the displayed results are associated with the desired chemical.
-
If results match the specific chemical, users can save the safety sheet to the Electronic Laboratory Notebook (ELN) by clicking the save button next to the relevant result tag. A green check mark icon will appear next to the result element tag, if SDS is saved successfully.
-
Once saved, users can initiate additional search queries to retrieve safety phrases or search for chemical and physical properties related to the chemical.
-
Users have the option to delete the saved data sheet by clicking the delete icon button.
-
The button will be disabled, once one SDS is saved. To enable another search query, the user has to delete any saved SDS first.
-
Additionally, users can access the vendor's product webpage by clicking the external link icon button.
-
The user can query the safety phrases for this chemical from the vendor by clicking the button. Results render below as depicted in the image below.
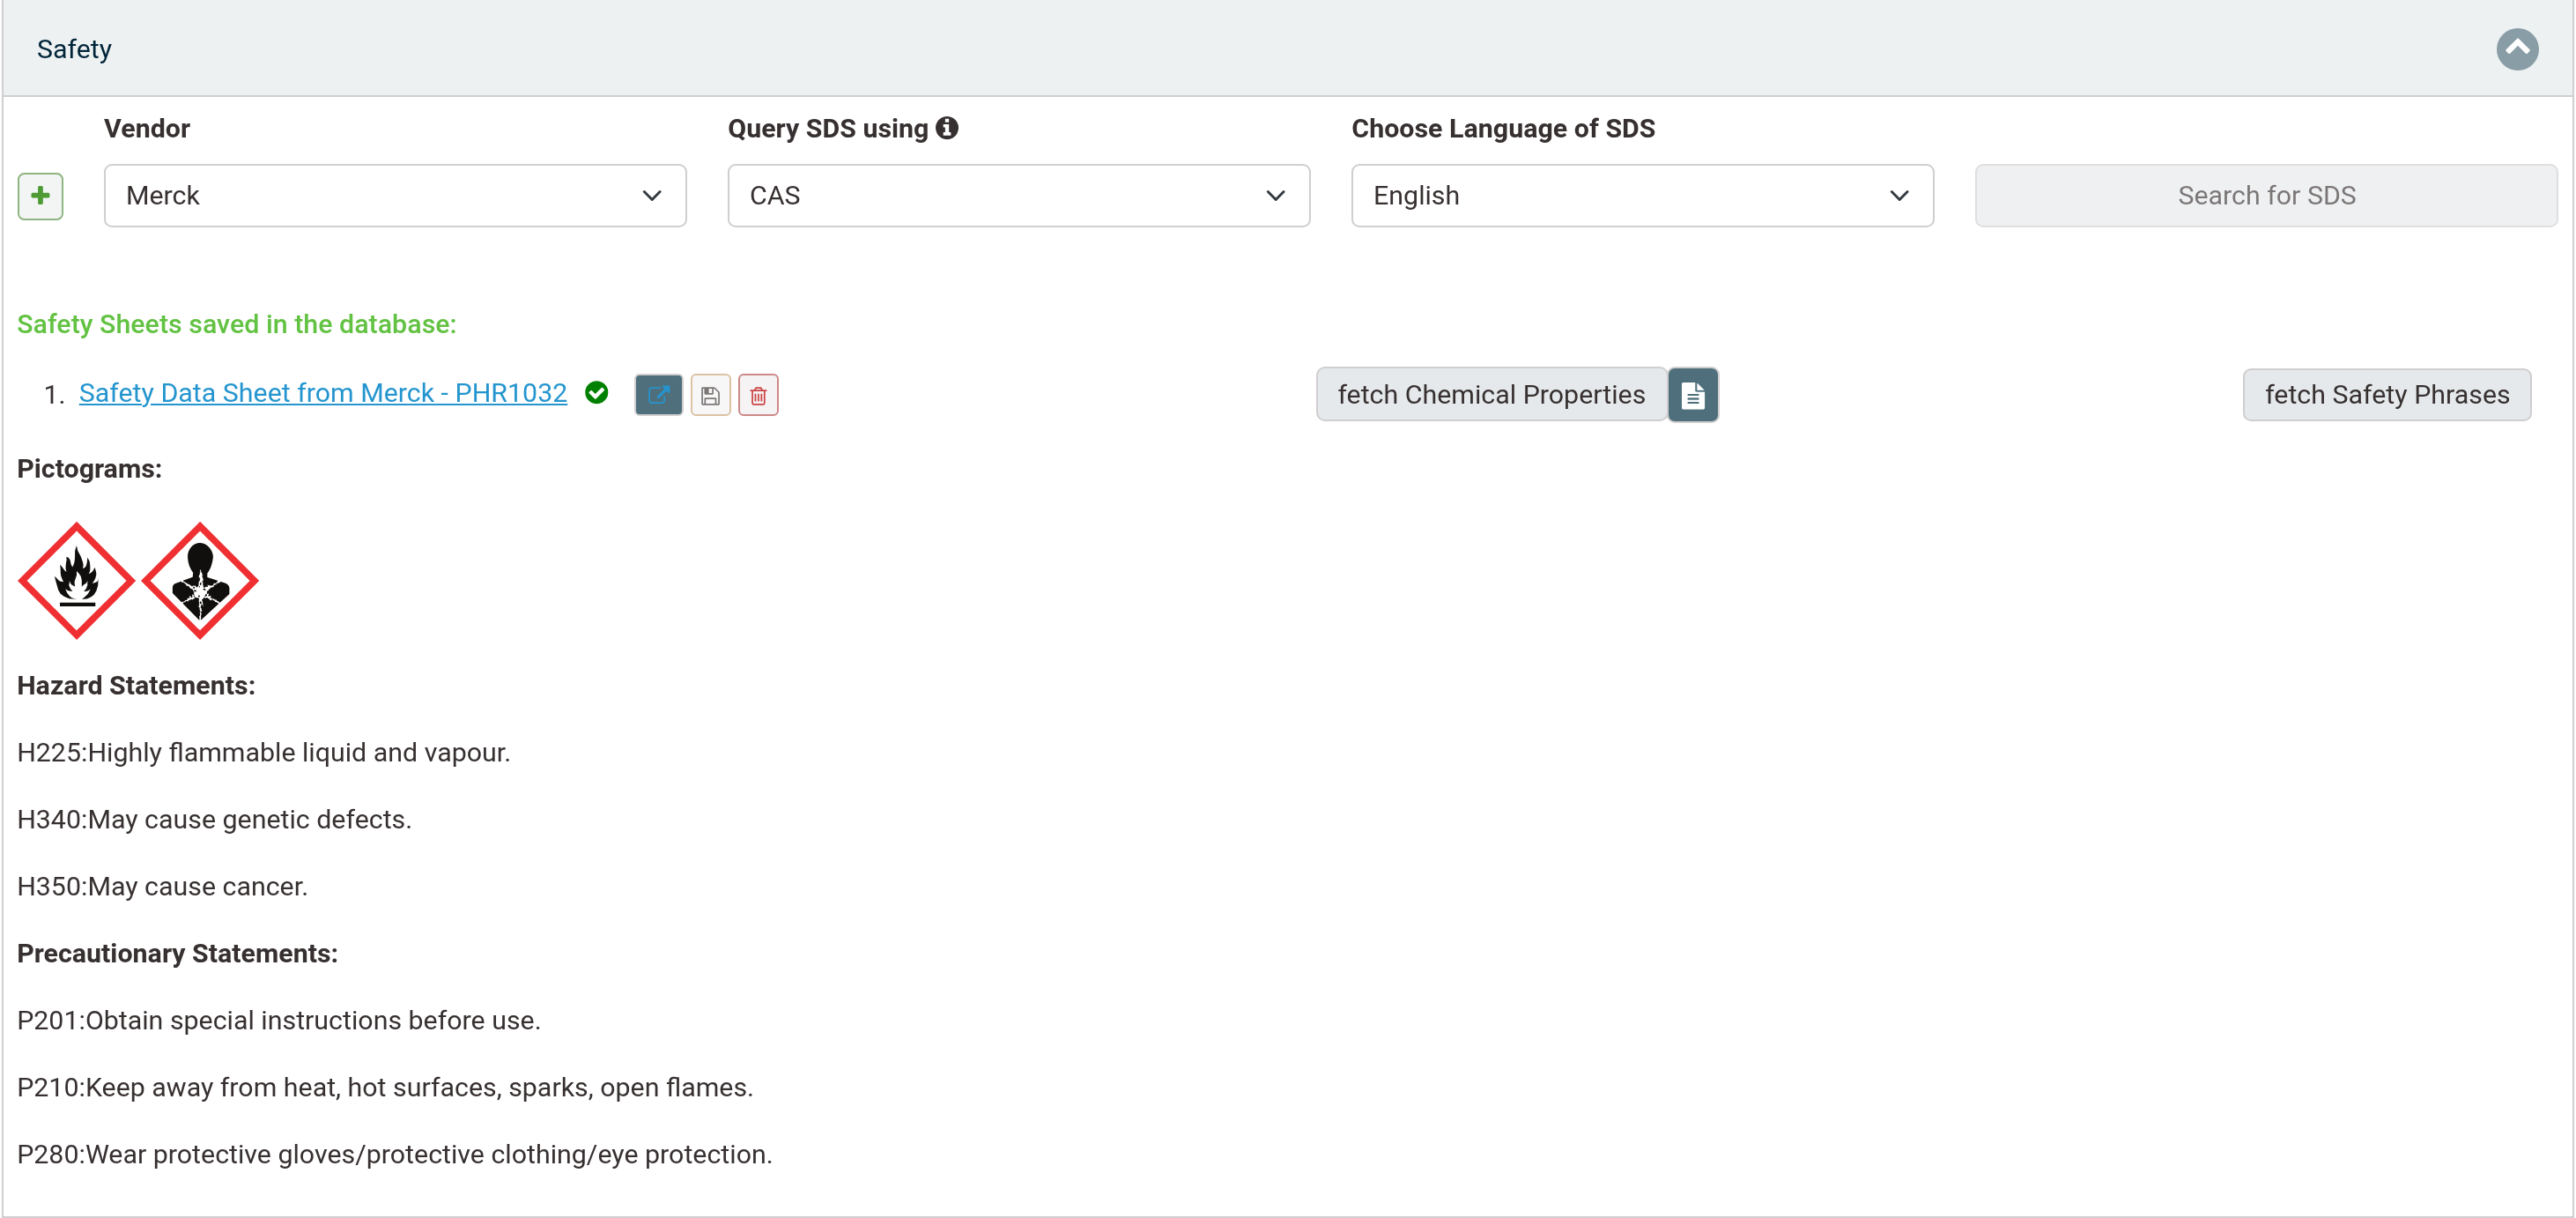 The fetched phrases are written into the safety phrases editor described in Adding safety phrases manually, where they can be reviewed and corrected.
 -
The button is intended to make a search query for chemical and physical properties related to the chemical and save them to the respective fields in the sample properties tab. Sometimes fetched results cannot be saved automatically if the fetched values cannot be accepted by ELN for some fields. In this case the user can view and modify the entered values manually. Fetched properties can be viewed by clicking the results icon button next to fetch button. The video below shows the fetch chemical properties process as it was originally designed.
The function is currently not functional. The button is still present in the Safety section, but retrieving chemical and physical properties from the vendor no longer works. Please enter these values manually in the Properties tab. The video above therefore shows the intended behaviour, not the current one. All other functions of the Safety section (SDS search, saving SDS, and fetching safety phrases) are unaffected.
Adding safety phrases manually
Safety phrases do not have to come from a vendor query. The safety section contains an editor that lets users curate the safety phrases of a chemical entry by hand, which is useful when no safety data sheet (SDS) can be found, when the vendor returns incomplete results, or when a substance is prepared in-house.
The editor is always shown at the bottom of the safety section and is organized into three parts:
- Hazard Statements — the H-codes of the chemical (for example
H225). - Precautionary Statements — the P-codes of the chemical (for example
P210). - Pictograms — the GHS hazard pictograms (
GHS01toGHS09), displayed as images.
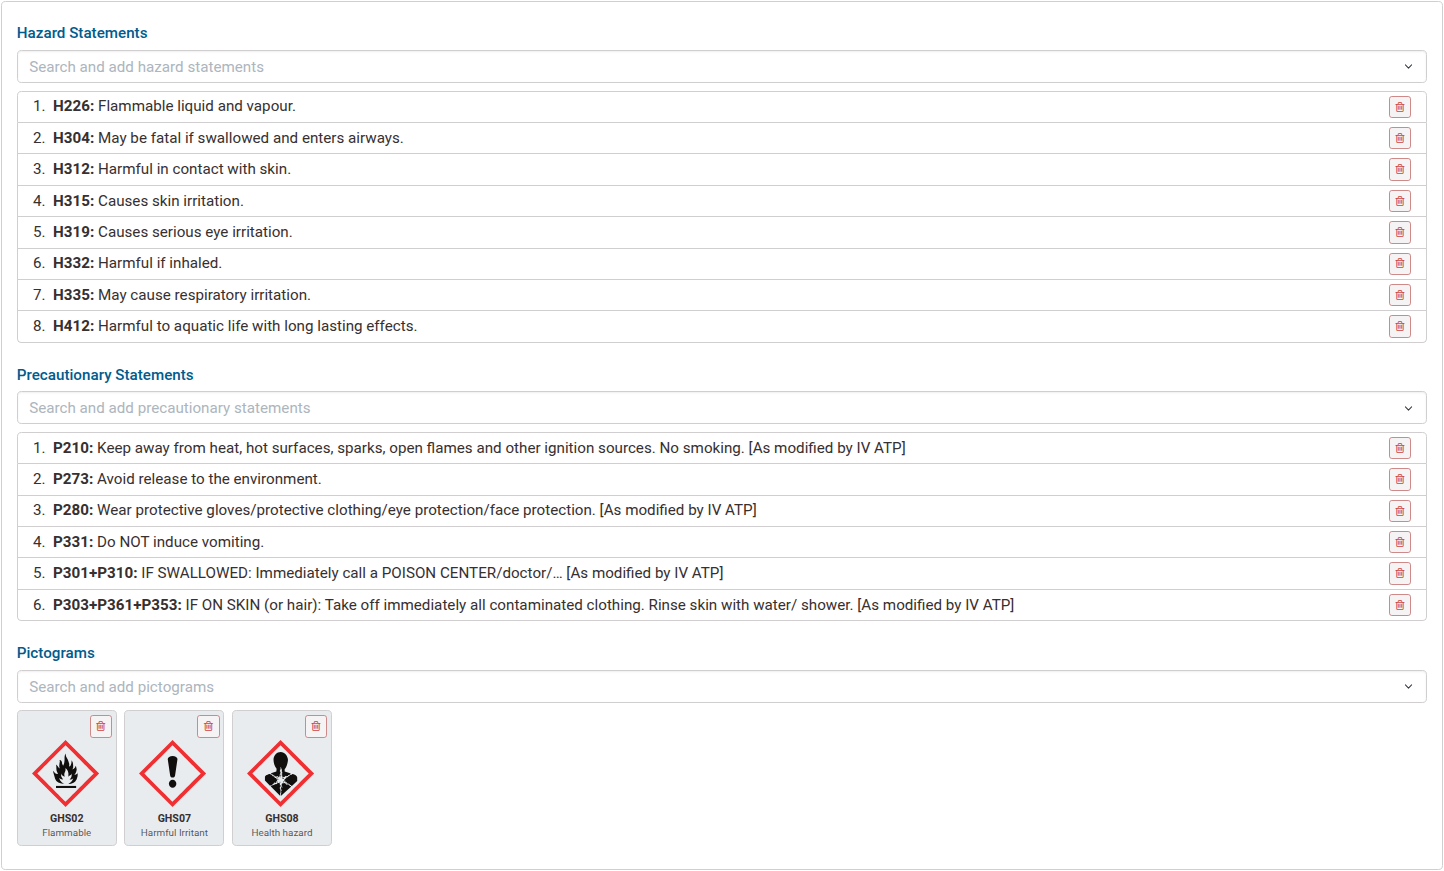
The editor panel is limited in height and scrolls internally, so a chemical with many statements does not push the rest of the inventory tab out of view. The screenshot above shows all three sections at once; in the running ELN the lower sections may have to be scrolled into view.
adding a phrase
- Open the inventory tab of the chemical entry and expand the safety list.
- Click the search field of the section that should be extended (hazard statements, precautionary statements, or pictograms).
- Type a code or a part of the phrase text. The drop-down filters the list of available entries while typing; codes that are already assigned to the chemical are not offered again.
- Select the desired entry from the drop-down. It is added to the list below the search field immediately.
- Click the save button at the bottom of the inventory tab to persist the changes together with the rest of the inventory data.
New entries are appended to the end of their list rather than sorted into it, so the order of the list reflects the order in which the phrases were added.
The selectable codes are taken from the GHS dictionaries shipped with the ELN. Besides the plain H- and
P-codes, these dictionaries also contain the combined codes (for example H300+H310 or P301+P310) and
the European supplemental hazard statements (EUH codes), so these can be selected as a single entry
instead of being assembled from their parts.
removing a phrase
Each entry in the hazard and precautionary lists carries a delete button , and each pictogram card carries the same button in its upper right corner. Clicking it removes that entry from the chemical entry. As with adding a phrase, the removal becomes permanent only after the inventory tab is saved.
A successful vendor query replaces the complete content of the editor: if the query run with returns phrases, they overwrite the lists, so manual additions and removals made before the query are lost. It is therefore advisable to run the vendor query first and to refine the result by hand afterwards.
A query that returns nothing leaves the existing phrases untouched — if the vendor has no data for the chemical, or the lookup fails, only a warning is shown and the editor keeps its content.
Attach Safety Sheets manually
This feature allows users to manually attach Safety Data Sheets (SDS) to chemical samples. It provides a user-friendly interface for uploading files and entering relevant metadata, ensuring that safety information is properly associated with the chemical.
Overview
The manual SDS attachment functionality allows users to:
- Upload a PDF file as the SDS.
- Provide metadata such as product number, vendor name, product link, and safety sheet link.
- Validate some inputs to ensure data integrity.
Key Features
- File Upload: Restricts file uploads to PDF format.
- Input Fields:
- Product Number
- Vendor Name
- Product Link (optional)
- Safety Sheet Link (optional)
- Validation:
- Ensures required fields are filled.
- Validates URLs for product and safety sheet links.
- Displays error messages for invalid inputs.
Workflow
- Click the "Add Attachment" button.
- Fill in the required fields and upload a PDF file.
- Click "Submit" to save the attachment.
Validation Rules
- File Type: Only PDF files are allowed.
- Product Number: Must be non-empty.
- Vendor Name: Must contain only letters.
- URLs: Must be valid URLs if provided.
Error Handling
- Displays error messages for invalid inputs.
- Prevents submission if required fields are missing or invalid.
Location and Information List
The Location field is divided into 2 subsections host location, host group, which reflects information about owner of chemical and current location, current group in case chemical is borrowed by another group/person. Both subsections have overlapping fields.
building, room, cabinetwhere the chemical is stored.group:related to the chemical.owner:the person responsible for the chemical.by:the person who borrowed the chemical.
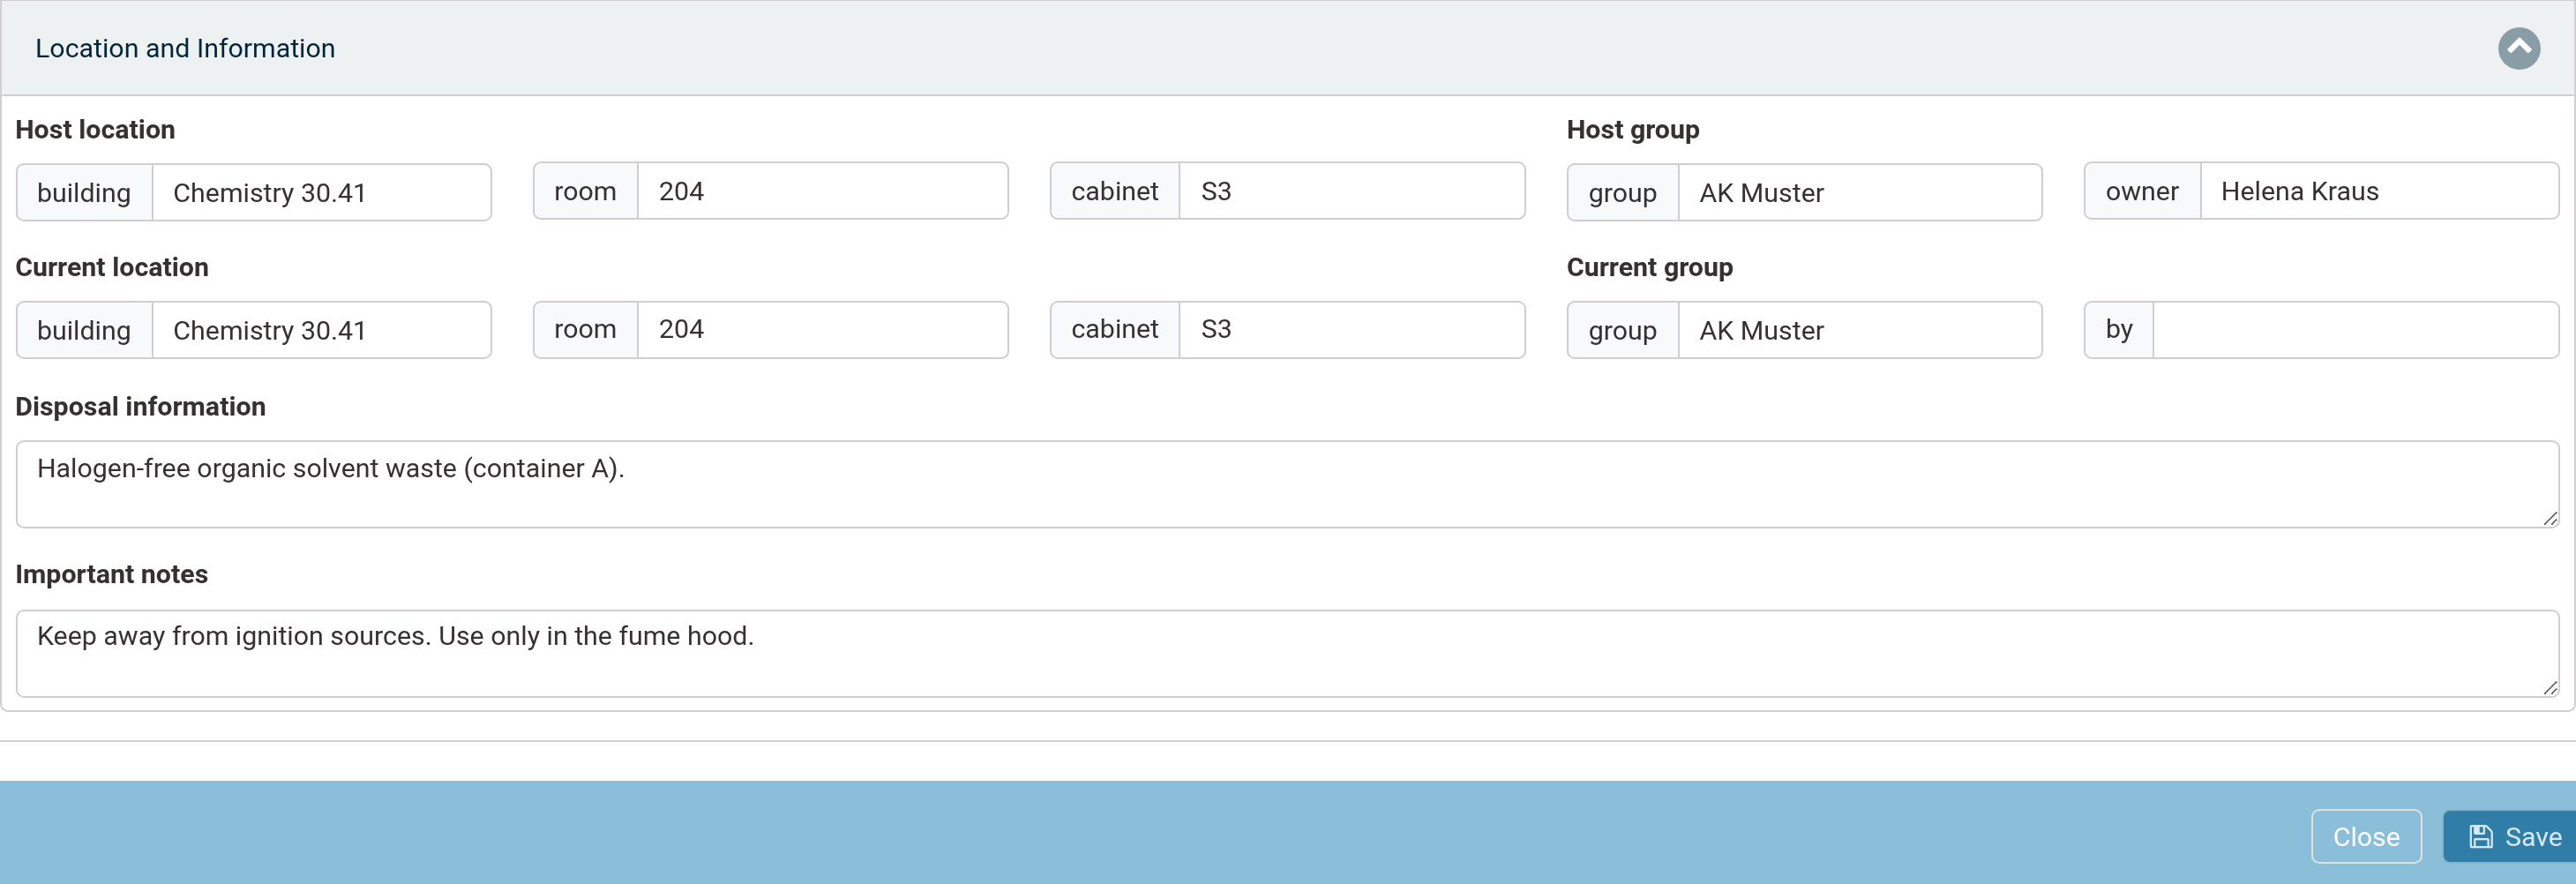
User can use Disposal information field to save any information related to the disposal of the chemical or use important notes field to save any other relevant information. The user can click the save button after making any changes or updating any field inside the inventory tab to save the changes. The save button is located at the bottom of the inventory tab.
Import and Export Chemicals
The Import and Export of chemical data functionality has been integrated into the core ELN export/import data feature within the Chemotion ELN platform. For a comprehensive understanding of the fundamental procedures involved in importing and exporting various elements and samples within the ELN system, users can check the Import and Export data section. Users are provided with the flexibility to choose between exporting/importing individual chemical samples or multiple selected samples. Export and import are reached through two separate paths:
- Export uses the
Exportbutton in the collection toolbar , which offers Export samples from selection and Export reactions from selection. Chemical entries are exported with the Export samples from selection option.
 - Import is not part of the toolbar. It is started from the dropdown menu next to a collection's name in the collection tree on the left, using the Import samples to collection entry.
Chemical samples are imported from an XLS/XLSX sheet and exported as XLSX or SDF.
Export Chemicals
To initiate the export of a chemical sample, the user selects the chemical entries in the collection and picks Export samples from selection from the Export button in the toolbar.
This opens the Select Data to Export dialog, in which the fields to be exported are grouped into sections: Sample properties, Molecule properties, Reaction properties, Wellplate and well properties, Analyses, Chemicals, and Components.
The Chemicals group holds the inventory fields (status, vendor, order number, amount, price, person, required date, ordered date, expiration date, delivery date, opening date, storage temperature, required by, safety sheet link, product link, pictograms, h statements, p statements, host building, host room, host cabinet, host group, owner, current building, current room, current cabinet, current group, borrowed by, disposal info, and important notes) and has its own Select all checkbox, so all chemical properties can be selected at once.
Additionally, the user can opt to include further sample or molecule properties to the exported sheet. To run the export, press and choose either XLSX Export or SDF Export. An example of export chemical process is shown below.
Import Chemicals
To start the import of chemical samples process, users should follow these steps:
- In the collection tree on the left, open the dropdown menu next to the name of the collection the chemicals should be imported into. It contains the entries
Reference ReportandImport samples to collection. - Click
Import samples to collection. The dialog Import samples from file to {collection name} opens, which is the interface for uploading the chemical sheet. There is no separate chemical import: chemical entries are imported through this same sample import, using the chemical columns of the template below. - It is strongly recommended that users utilize the provided chemical template below, as importing chemicals necessitates specific data points. In order to import a sample into Chemotion ELN, it is generally required to have at least one of the following columns present in the import data: Canonical SMILES (SMILES) or Molfile. While the remaining columns are optional, providing more details is encouraged for comprehensive record-keeping.
- Additionally, users have the capability to import safety data sheets into Chemotion ELN by entering relevant information into the designated fields such as safety data sheet and vendor. Please note that this option is presently compatible only with the Merck vendor.
- Importing is also feasible for samples and chemicals that do not possess a chemical structure (referred to as decoupled samples). In such instances, users should indicate the value yes in the column of decoupled. If the sample has chemical structure, it is imperative to ensure that any of the columns relevant to the chemical structure, such as molfile and canonical SMILES contain valid data.
For the import process of a chemical inventory entry, Amount in the inventory tab should be entered using the column header labeled Amount, which refers to the amount of the chemical inventory entry in grams.
The Target/Real Amount column headers, however, refers to the Amount field in the Sample Properties tab, which is specific to the sample and not related to the inventory entry.
Following these steps enables the comprehensive import of chemical samples while maintaining the integrity of essential data for efficient management within the Chemotion ELN system. An example of import chemical process is shown below.