Toolbar Functions
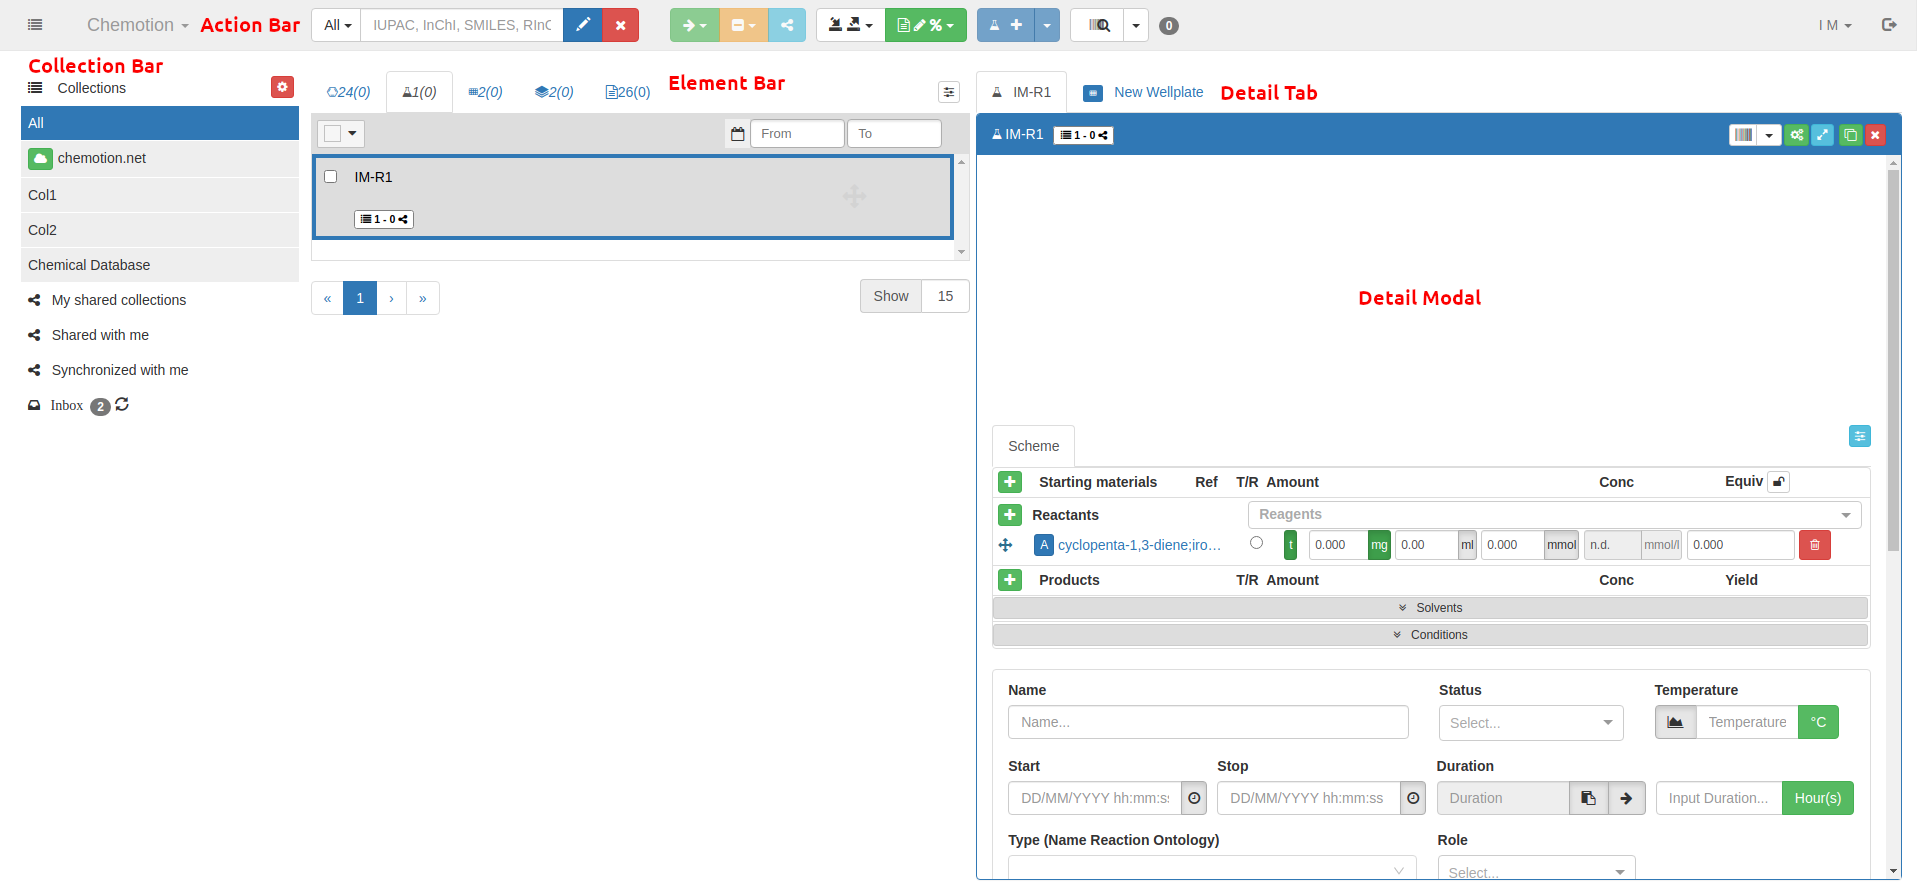
The toolbar (or action bar) provides a variety of functions to control the Chemotion ELN elements. Those functions include adding, copying, deleting, moving, filtering, importing and exporting.
Filtering
The user can filter a selected collection or even the All collection with the filtering bar  .
.
The user can search the entire collection or selected elements by clicking on and choosing the desired element (Samples, Reactions, Wellplates, Screens) from the menu to appear, where the is replaced by the corresponding symbol of the element. The menu also shows the option of Advanced Search, which will be clarified later on in this chapter.
Possible search terms are IUPAC names, InChI, SMILES, RInChI. The user can also use the element Name or Short Label. Enter the search term and press "Enter" which shows a list of filtered results. While the user is typing their search term, a menu of suggestions appear, and it keeps getting updated throughout typing. Another option will be to use Ketcher editor, which opens when pressing , and to draw a structure to perform Similarity Search or Substructure Search, and to decide the degree of similarity too. When the structure is ready to be used, the user can choose or simply . To cancel the search process or delete the current search term, press
YouTube will track your interaction with them.
Substructure search

In the Advanced Search, the user can Select search type which opens a menu to pick from looking up the EXACT term, or entering a substring to look up for, and here the substring can either be included for the search (LIKE (case insensitive substring)) or excluded (NOT LIKE (case insensitive substring)). In both cases, more strict case sensitive searches can be done with LIKE (substring) and NOT LIKE (substring). Another menu enables the user to choose the term type. Available options are Sample Name, Sample Short Label, Sample External Label, and CAS. Finally, there is the field for the Search value. When the user enters all the entries, they should choose . If they want to cancel the search, they could choose .
Although the Advanced Search states Sample in its menus, e.g. Sample Name, it could actually be applied to other elements too.
Organizing elements in collections
Add elements from one collection to another
Elements from one collection can be added to another one by means of moving or assigning. The elements added to the target collection have the same properties as the original ones. If some elements already exist in the target collection with the same short label as the added elements, only the added elements are kept, i.e. the properties of already existing elements will be updated based on the added ones.
The above mentioned action could be done by selecting the chosen elements, and pressing . A menu opens with two options: Move to Collection and Assign to Collection. Both options will open the following window to Select a Collection as a target from a drop-down menu, or Create a new Collection by inserting its name in the corresponding field. When the user is done, they are to press .

Please note that if the user chooses to Assign to Collection, the title of the window will be Assign to Collection.
Move to Collection: This action results in moving the selected elements from the selected collection to the target one, this means that the moved elements will no longer appear in the original collection.
Assign to Collection: This action results in creating a copy of the selected elements in the target collection, this means that the assigned elements will be present in both collections.
Remove elements from a collection
This action can be performed by pressing . A menu opens with two options: Remove from current Collection and Remove from all Collections. When the user removes samples that are associated with other elements such as reactions, the other elements still stand, but the deleted samples will not be accessible, e.g. from within a reaction, anymore, and there will be no way to edit them.
Remove from current Collection: This action removes the selected elements only from the selected collection, but a copy is kept in the back up collection All. The user is asked to confirm their decision via a pop-up window by pressing , or otherwise to press .
Remove from all Collections: This action removes all the copies there are of the selected elements. The user is asked to confirm their decision via a pop-up window by pressing , or otherwise to press . An option is provided in case the user is trying to remove reactions, which is to choose whether to delete the samples associated with the reactions, if the user chooses not to, then only the reactants and solvents associated with the deleted reaction are deleted too.
Sharing collections
Shared collections are collections that can be created by users if they want to share their data with a specific person or a group, so Sharing will make the data available to that person or group.
Collections shared by the user appear as My project with owner/recipient in My shared Collections in the collections bar and can be sorted through collection management. A Chemotion ELN user who receives information in the form of a shared collection from another Chemotion ELN user cannot sort that shared collection.
An important feature of the shared collections that the user, whether a creator or a recipient of the shared collection, must be aware of: Changes to the shared collection can only be made to existing elements. When new elements are added within the original collection, this is not reflected in the shared collection. Only changes within existing elements are transferred to the shared collection. This is a significant difference from the synchronized collections.
In a shared collection, only changes to existing elements are displayed to users. Elements added after sharing to the original collection will not be considered.
To share a collection, press , this will open the following window.
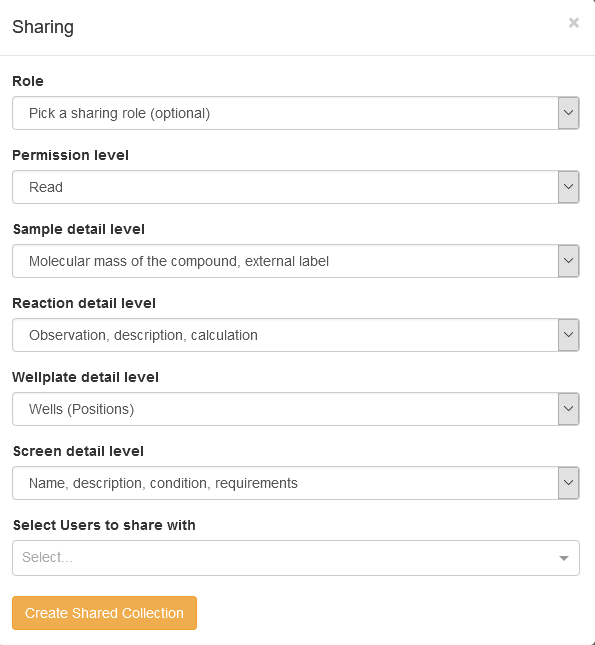
Collections that a Chemotion ELN user has obtained as shared collections from another user are subject to a rights system, which is always defined by the original owner. According to these system, the recipient of the shared collection can perform certain actions on it. The original owner can optionally set a Role to the recipient. Each role corresponds to a default Permission level, and means that Everything is being shared when it comes to the detail level for samples, reactions, wellplates, and screens. The original owner can still change those Permission levels and detail levels, but in this case the Role already set will be removed. The following table shows the possible Roles with the corresponding Permission levels.
| Role | Permission level |
|---|---|
| User | Delete |
| Partner | Write |
| Collaborator | Read |
| Reviewer | Read |
| Supervisor | Import Elements |
The Permission levels are sorted in a hierarchy, where every higher level includes all the permissions of the lower ones.
Read: The lowest of Permission levels where the recipient can only see the details of the shared collection without being able to modify anything.
Write: The recipient can additionally modify the shared elements through the details modal.
Share: The recipient can additionally share the elements with a third party.
Delete:
Import Elements: Both the owner and the recipient can’t create new samples in a shared collection. However this ** Permission level ** allows the recipient to additionally import new samples into the collection, a right that is always granted to the original owner.
Pass ownership:
Import and Export Data to and from the Chemotion ELN
Importing and exporting data can be done using the icon ![]()
Exporting data
The user can export either selected elements from a collection in the form of files, or export collections as zip.
To export elements, go to the collection that contains them, and select the desired elements. From the exporting icon in the toolbar, pick Export samples from selection. Please pay attention that not only samples can be exported with this option but also reactions, wellplates, and analyses. If multiple types of elements were to be exported as an XLSX, they are sorted in different sheets in the file.
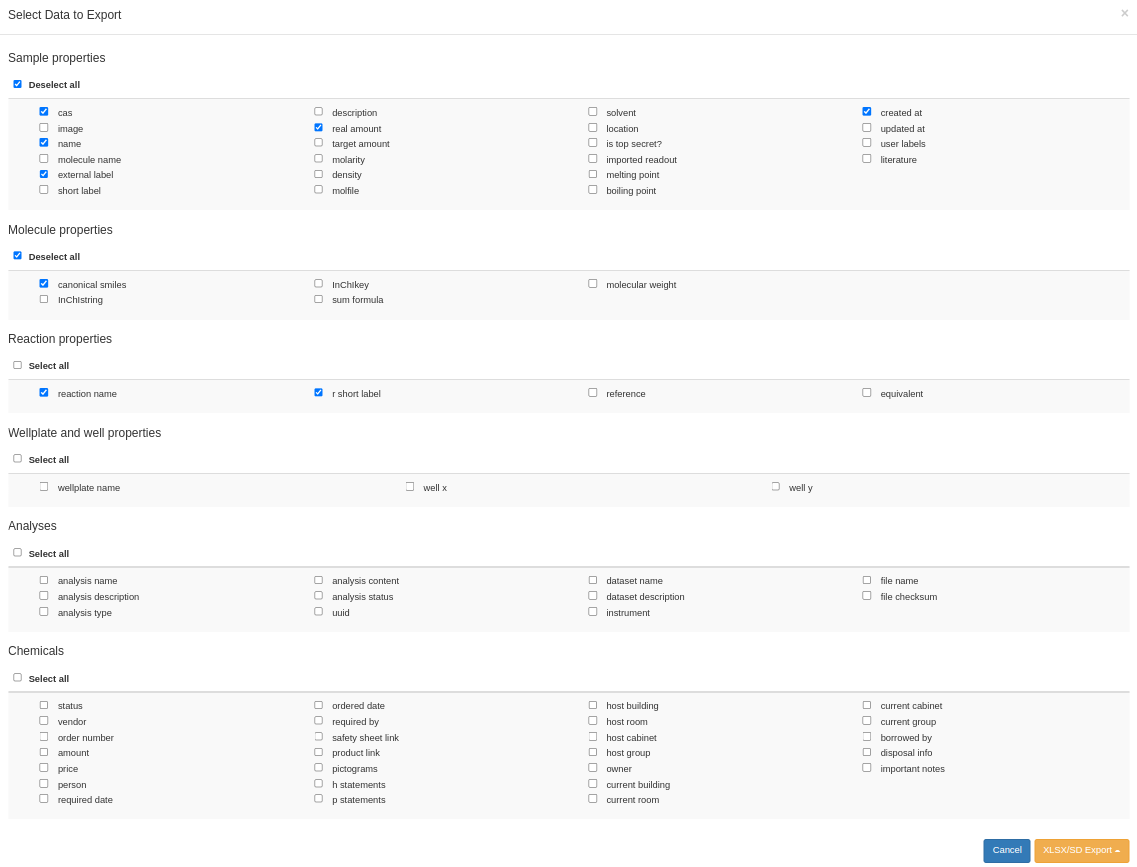
The window above opens where the user picks the properties to be exported with the elements. If they want to proceed, they press , which enables the user to choose either XLSX Export, or SDF Export. Otherwise, press . Follow this link for a video on exporting samples as xlsx files.
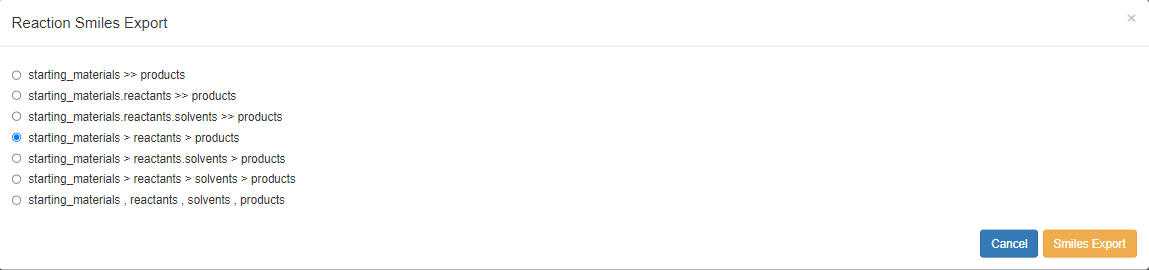
To export reactions, the user has two options, either to use the above mentioned Export samples from selection, where details about the samples included in the reaction are exported, or to use Export reactions from selection. In this case, only the SMILES are extracted. The window above opens where the user can pick which parts of the reaction to extract (starting materials, reactants, products, solvents). They could also choose the format of ordering those SMILES. If they want to proceed, they press . Otherwise, press .
To export reactions, wellplates, or analyses, you can use Export samples from selection.
Importing Data
Samples can be imported easily using an Excel template that contains SMILES-Strings. To enable the import into a collection, the desired target collection has to be selected. Please see the following example which can be used as a template to import data to the Chemotion ELN. The template file can be used as a test file to check the functions of the Chemotion ELN, for a specific import, please delete the current content.
Please don't change the header of the template file.
Information on the columns and requirements: The columns "stereo_abs" and "stereo_rel" are predefined. Valid values are: stereo_abs: any, rac, meso, (S), (R), (Sp), (Rp), (Sa); stereo_rel: any, syn, anti, p-geminal, p-ortho, p-meta, p-para, cis, trans, fac
After downloading the XLSX template, you can import it in your Chemotion ELN as shown below:
Please add either molfile or SMILES-Code to the import template. The import process will fail if both are entered.
Available from v2 onwards: Importing melting point, boiling point, location, refractive index, flash point, density, and molarity for samples.
Reporting and Literature Organization
Report
This icon helps the user to produce reports and organize the literature in their data.
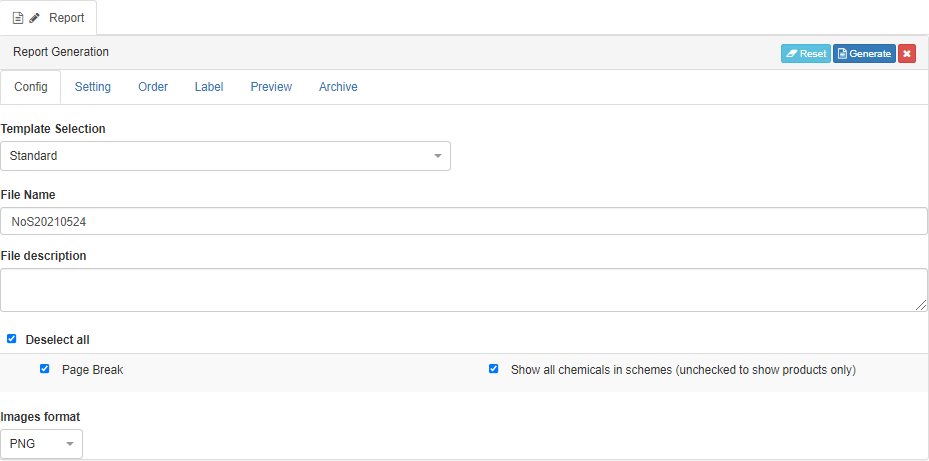
You can report the elements you have by selecting them and clicking on Report, this will open the window above. From the config tab, choose from Template selection. This choice affects the fields in the other tabs and the File Name that is given to the file by default. This ** File Name** includes the date of report generation which can still be edited by the user. In all the templates a field for File description is provided. In the Setting tab you can choose what properties to add to the report. In the Order tab you can resort your elements by using the symbol , and you can also delete elements from the report with . Before generating the report, you can see a Preview in the corresponding tab. When your report is ready, press at the top of the report window. You can reset everything to its default and start a new report by pressing , or you can leave the report by pressing .
The Archive tab contains all the generated reports (except the deleted ones). Here the user can reuse previous reports to generate new ones by using . They can download the generated reports with , or delete them with .
Creating Elements
The generation of new element-instances such as a new sample or a new reaction can be done by three different actions: add, copy and split. The function add is available for all types of elements, the functions copy and split are only available for selected ones.
New Elements by using the function "add"
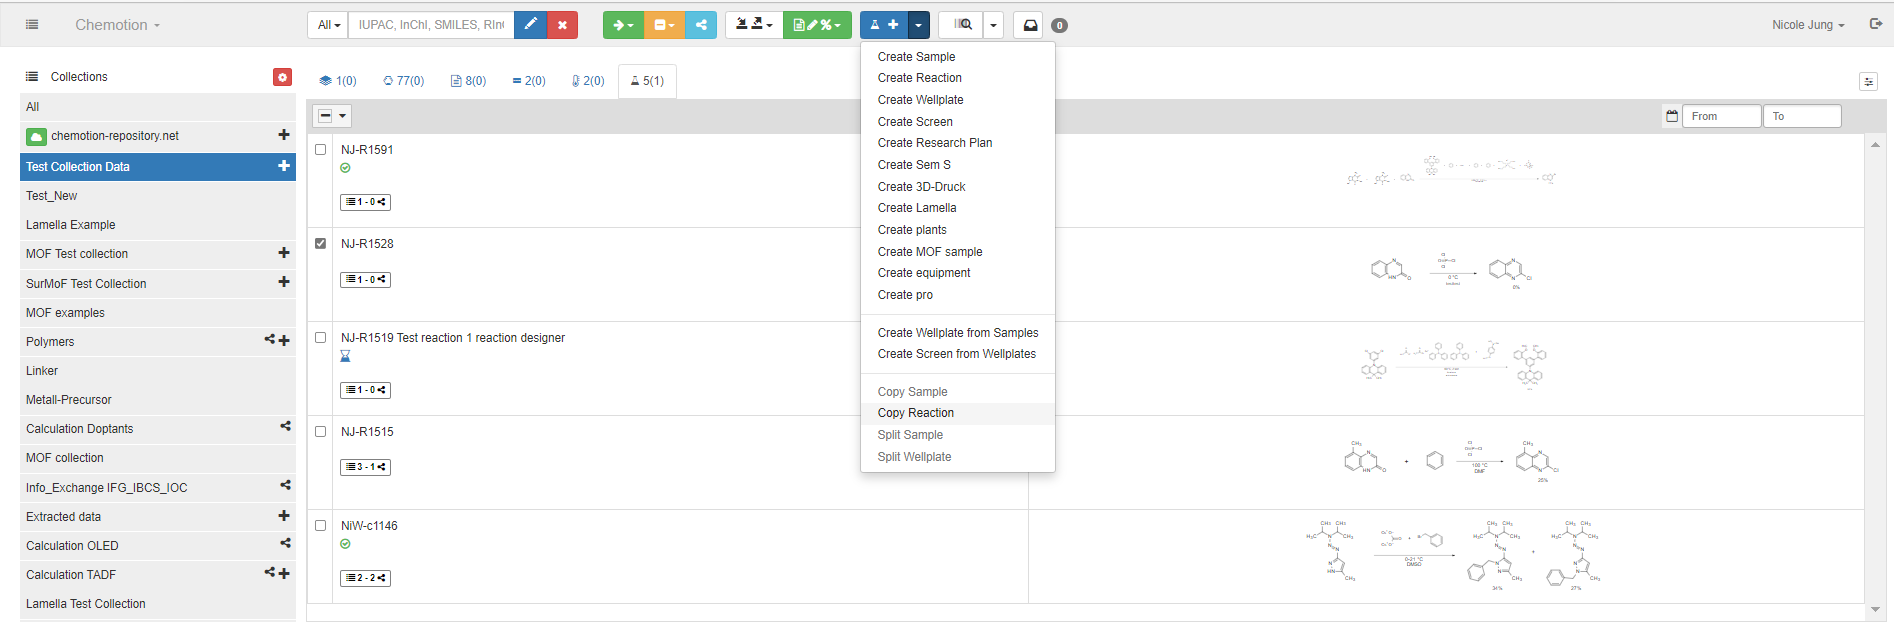
There are two buttons to create elements: , which changes its appearance based on the selected element in the element bar, e.g., if the user is already in the reactions list from the element bar, the button will look like . If you press this button, a new reaction will be generated immediately in the collection you are already in. The other button is in the shape of an arrow . If you are using the arrow button, a menu with the following options is opened: Create Sample, Create Reaction, Create Wellplate, Create Screen, Create Research Plan. It doesn’t matter in which list you are as long as you are in the right collection, choose any of the above options and the corresponding element will be created. To populate wellplates, the user has to drag and drop samples, and to populate screens, the user has to drag and drop wellplates. The arrow button menu enables the user to avoid this repetitive drag and drop process by offering the two functions: Create Wellplate from Samples, and Create Screen from Wellplates. To use either of them, go to the target collection, select the elements (samples or wellplates) to be added to the newly created element (wellplate or screen respectively), and choose the corresponding function (Create Wellplate from Samples or Create Screen from Wellplates). Please note that you will not be able to create an element with this method from elements coming from another collection. However, you can still add them to the created element with the classical drag and drop.
Function "copy" or "split" for samples
In the last section of the menu, one can find the copy and split functions. Generation of new samples with molecular structures that are already used by another samples can be carried out by two similar but not equal actions, Split Sample and Copy Sample.
To copy a sample, first select the sample whose structure you want to copy from the Samples list and then press the button in the action bar. The Copy Sample function is offered there in the lower area. When the function is selected, a details modal is opened for a new sample to be edited.
With the Copy sample action you only copy the molecular structure of the sample, all other information is not available and will not be adopted. Only the general data available from the molecular structure are transferred.
When creating a new sample using the split function Split Sample, a new sample is created that is directly dependent on the original sample. In contrast to copy, with split not only the structure-dependent information of the original sample is taken over for the creation of a new sample. All available data are used to generate the new sample. The action is intended to represent those cases in the laboratory in which something is removed from a batch and used for a new purpose. Examples of a split action are therefore e.g., the removal from a chemical container or the further use of a product from a reaction. For more details on Samples generation, visit this link.
Function "copy" for reactions
Reactions can be copied via the same copy function as described for samples. Please ensure that the reaction that you want to copy is selected. The action "copy of reaction" generates a template with the same information on the original reaction which then needs to be saved. After saving the new reaction, a new reaction number is registered and new samples assigned to the new reaction are generated in parallel.